
Having escaped that strange hospital with the unconscious werewolf, you now find yourself transported into a beautiful theater. Although everything still carries a bit of eerieness to it, you can’t help but feel mesmerized by the quiet beauty of the old-fashioned theater. Today, we’ll show you how to complete the theater episode in our Tricky Doors level 8 walkthrough! Let’g get going!
Tricky Doors Level 8 Complete Walkthrough
You’ll start this episode in the foyer of the theater. First off, examine the green couch on the left side to find a Tag (1/4), and don’t forget the Plank (1/4) hiding under the couch.

Related | Tricky Doors Level 5 Walkthrough
Next, examine the coat drop-off counter on the left side. Grab the Porcelain Mask (1/2) off the counter, and then examine the lone, teal coat hanging on hook 53. Grab the Handle from the coat pocket, and take note of the crooked hook on the right—we’ll be coming back to it later. Leave the counter.
Examine the window on the right side. The window is missing a handle, so plug in the Handle you just picked up. Open the window and grab the Key off the outside window sill.
Examine the grandfather clock on the left side. Use the Key to unlock the front panel and grab the Porcelain Mask (2/2). Examine the chains and your character will note that something appears to be missing from the clock’s internals.
Got the double doors in the middle of the room and use the Porcelain Masks on the slotted shutters. This will reveal the first major puzzle of the episode.
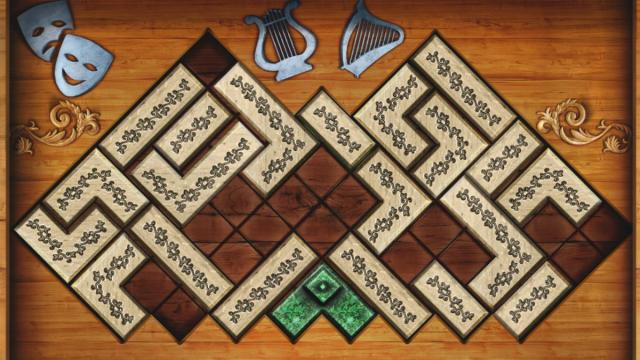
Your objective here is to move the green triangle on the bottom of the board to the position above it. The position is initially covered by the regular pieces, so you’ll have to move them out of the way first. Each piece can slide in any direction, whether that’s up, down, left, or right, so take advantage of this.
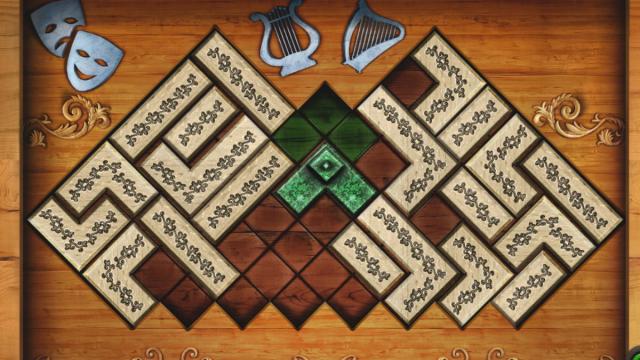
There are multiple ways to solving this puzzle, but to give you a general idea of the correct order to move the pieces in, here’s what our board looked like right before we solved it:
The double doors unlock, so go on through. You’ll be in front of a stage. Examine the grand piano on the stage to get a Tag (2/4). Open the key cover, and you’ll notice some keys are missing. Leave the piano.
Examine the harp in the bottom right corner and pick up the Piano Key (1/3) sitting at the base of the harp. Leave the harp, and then examine the fallen ladder on the stage and pick up the Knife. Grab the Sand Bag (1/3) next to the ladder.
Move forward to reach the backstage. Examine the wooden tool box in the middle of the screen, and pick up the Pincers, Hammer, and Saw. Examine the boarded up elevator doors on the left. Use the Hammer on the boards to receive Nails and a Long Plank.
Go back to the stage. Use the Pincers on the harp strings to receive String. Examine the fallen ladder on the stage once more, and then place the Long Plank on the ladder to set it in place. Use the Saw to cut it in half and receive two more Planks (3/4).
Return to the foyer, and examine the green sofa on the left again. Use the Knife on the blue rope to get Rope. Leave the couch, and examine the camera on the tripod and use the Knife to get Lens (1/2). Go to the coat counter, and use the Knife on the crooked hook near the teal coat to get a Hook. Combine the Hook with Rope to get Rope with Hook.
Go back to the stage. Use the Rope with Hook to climb up to the box above the stage on the right side of the screen. Take the Broken Binoculars, Plank (4/4), then read the orange note for a clue to a password. Use the Pincers on the purse to pry it open, then grab the Powder and Piano Key (2/3).
You have all four Planks now, so it’s time to repair the ladder. Place the Planks to situate them in their proper places, then use the Nails and Hammer to secure them. The Ladder is completely repaired, so use it to reach the stage light right above its original location. Break open the light with the Hammer to get a Key.
Go backstage, and go up to the door with the drama faces on it and unlock it with your new Key. You’ll find a strange locking mechanism and the second major puzzle of the episode.
Related | Tricky Doors Level 4 Walkthrough
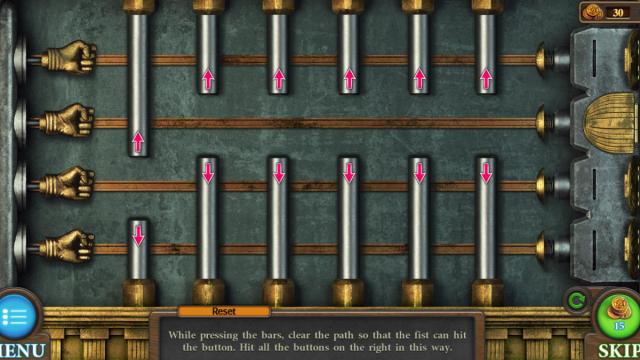
Your objective here is to clear the way for the fists on the left to reach each button on the right. The bars can be moved up and down, but keep in mind that specific bars will make other bars go in the same or opposite direction. From left to right, we’ll number them and tell you which bars they control.
- The first bar moves the second, fourth, and fifth bars in the opposite direction.
- The second bar moves the third and sixth bars in the opposite direction.
- The third bar moves the fourth and fifth bars in the opposite direction.
- The fourth bar moves only the sixth bar in the opposite direction.
- The fifth bar moves only itself.
- The sixth bar moves the fifth bar in the opposite direction.
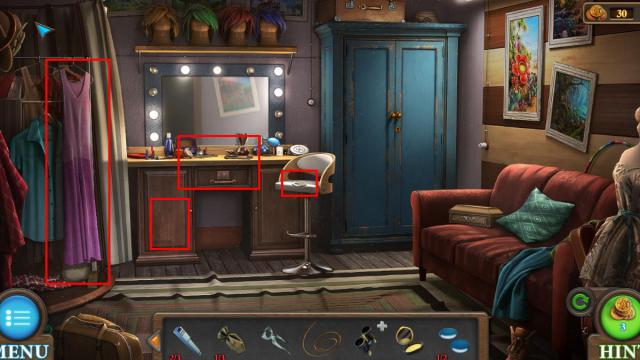
Once you hit all four switches, the door will unlock. You’re now in the dressing room, so grab the Tag (3/4) off of the white seat in front of you. Lift the pink dress on the left side, and grab the Sandbag (2/3). Examine the desk, and take the Brush and Tweezers. There are some locked puzzles you can check out, but you can’t quite interact with them yet.
Return to the foyer. Look at the window on the right side of the room again, and look carefully in the bottom left corner. You should see a metal object sticking out of the dresser’s cracks, so use your Tweezers to grab a Tag (4/4).
With all four Tags recovered, head back to the coat counter. Place the Tags on the counter, then place the Powder next to them. Use the Brush on the Powder to reveal the Tags’ numbers. Take note of the corresponding coats and their colors. Heads up—your colors may differ from ours.
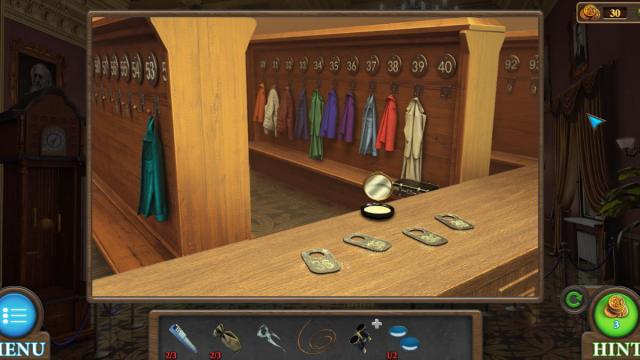
Return to the dressing room. Examine the drawer in the middle of the dresser, and press the colored buttons in order from the lowest tag number to highest, matching the buttons with the colored coats.
Take the Weight and the Piano Key (3/3). Combine the Weight with the String, then use the Pincers to fasten it to get the Clock Weight. Before you leave, make sure to take note of the eleven lights on the mirror, paying attention to the ones that are on.
You now have all Piano Keys, so return to the stage and insert them into the Piano. For the third major puzzle, you need to hit the right keys to highlight all the brown tiles shown on the panel. When a key is pressed, those tiles will stay highlighted, unless they’re canceled out by another key. All brown tiles must be highlighted, and all non-brown tiles must not be highlighted.
Complete the puzzle and the inner compartment will reveal a Key. Return to the dressing room and use it to unlock the blue dresser. Take the Sandbag (3/3), then examine the shirt to fold over the side, then take the Lens (2/2) out of the inner pocket. Combine the Lens with the Broken Binoculars to repair the Binoculars.
Head back to the foyer. Examine the grandfather clock, and use the Clock Weight to start the fourth major puzzle. Remember the mirror lights from the dressing room? You need to open the doors on the clock face that correspond to the lights that were on.
Do so, and the clock face will open up to reveal a Hint. If you looked at the inaccessible puzzle box earlier in the dressing room, you’ll recognize the symbols immediately.
Return to the dressing room and examine the box sitting on the red couch. Place the Hint on it to begin the fifth major puzzle. Your objective here is to rotate the chips according to how they’re laid out on the hint paper.
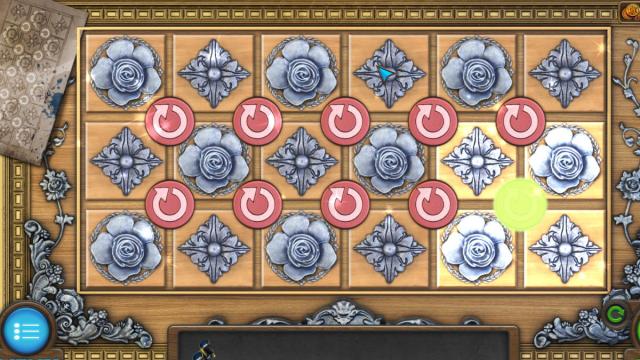
In our variation of the puzzle, we needed the flowers to form an X-shape on the left side, and a plus shape on the right side. Your hint may vary, but this puzzle isn’t too tricky—just keep rotating, and you’ll get it eventually.
The box will open up to reveal a Wheel and a Metal Face (1/2). Now that we’re done with that puzzle, let’s tackle the safe beneath the dresser. We’ll need some more clues before we can solve it properly.
Return to the foyer. Examine the middle painting on the top left wall and notice that there’s only three numbers for his years. Go to the coat counter, examine the briefcase sitting on the bench, and input the Wheel into the slot. The code is the three numbers you saw on the painting.
The briefcase will open to reveal a Lever. Return to the backstage, and place all the Sandbags on the ropes near the right side of the room. Place the Lever into the open slot to the left of them.
Using the lever will cause one of the Sandbags to lift, which switches the backdrop scenery on the stage. You can use the lever repeatedly to cycle between Sandbags.
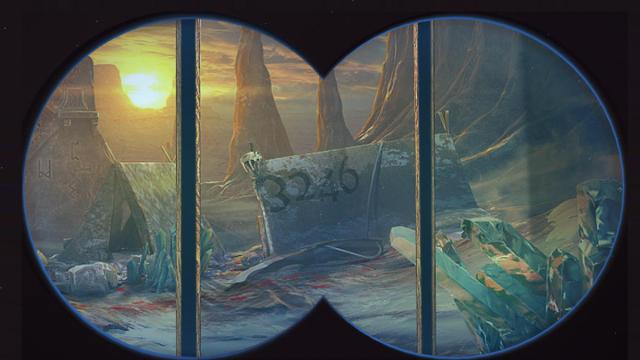
Return to the stage. If you recall the note in the upper audience box, the password for the safe “is on the scenery”, so use the Binoculars to get a closer look at the backdrop. Scan around, and you should see a four-digit combo written on a small slab.
Related | Tricky Doors Level 2 Walkthrough
There’s a four-digit combo on all four backdrops, each with different numbers. We never found out if there’s a way to tell which combo is the right one, so just write down all four combos. When you’re ready, return to the dressing room.
Examine the safe below the dresser and start trying all the codes you wrote down, as one of them is bound to work. Inside the safe is a Metal Mask (2/2), so now return to the foyer.
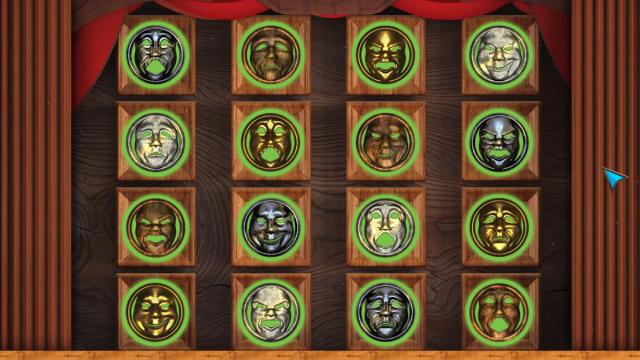
With the two Metal Masks in hand, examine the door on the right side of the room. Place them inside the panel, and get ready for the final puzzle of the episode. Your objective for this puzzle is to arrange the masks so that no two masks with the same color or expression are in the same row or column. You can move the masks freely around.
Though it sounds difficult, this puzzle isn’t actually too tricky. Just keep track of what emotions and colors you have placed, and you’ll do just fine. Here’s what our board looked like when we finished:
Complete the puzzle and the way out will be revealed to you. Congratulations, you’ve completed episode 8 of Tricky Doors! And with that, our Tricky Doors level 8 walkthrough comes to an end. If you have any other questions or tips, let us know in the comments below!


Published: Dec 29, 2022 03:58 pm