
You may find a comprehensive tutorial for the stylized single-player game Nowhere House, which was created by Dark Dome, on this page. The game was designed to seem like an escape room. The following is the first chapter of our comprehensive guide. Let’s not waste any time and go right into it since there are a lot of topics to discuss. Continue reading down below!
Note:
Before we go any further with this walkthrough, please keep in mind that some of these puzzles are different every time you play the game. Because of that, there’s no point including numbers in this walkthrough. Having said that, the process of figuring out how to solve these riddles is essentially the same.
The Story
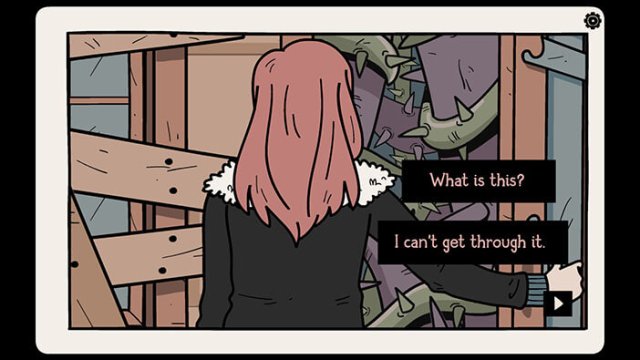
A witch used to reside in Hidden Town long ago. The villagers captured her out of fear for their safety. However, she inexplicably vanished on the day of her conviction and was never heard from again. She still lives in the same home at the top of the hill today. According to the urban legend, if you enter his home, you may get bound there permanently.
The witch disappeared into thin air after uttering a hex, never to be seen again. The tale of the witch and her curse has piqued the interest of three companions, who set out to investigate the abandoned building. As Brann and Lauriel look around and find nothing but darkness, we know right once that this is no regular location. However, Adria sees an ancient mansion filled with antiques. Adria is so frightened by this realization that she dashes for the door, only to discover that it is barred by thorns.
The Beginning
This is where your adventure begins. A quick note here. By clicking the arrows on the interface, you can navigate to different rooms. Back to our story.
- There’s a brown drawer. Open it and take the picture that’s inside it.
- You can see a face and, behind it, a shelf with various potions.
- Use the arrow on the right to go to the next room, and while you’re there, take note of the time on the clock.
- When you enter this area, the time will be different for some reason, and it will remain that way until you leave.
- Examine the shelves on the left. To solve this problem, arrange the potions in the sequence depicted in the image in your inventory. The bottom cabinet will now be accessible. Take the “Red Key” for example. When you take a step back, you’ll discover a flying broom.
- Leave the room and go to the room on the right. Pull the curtain down. After that, you’ll get a cutscene.
- Return to the room where the clock is and check the time. Open the brown door using the red key from your inventory and descend the stairs.
- Click the correct arrow. You’ll see a table with a little drawer on top. Examine the drawer. To add the batteries to your inventory, open the top drawer. Select the batteries from your inventory and place them in the walkie-talkie. Tap the right arrow to enter the next room to your right.
- Choose and open the drawers. A hint may be found in the bottom right one. Take note of the problem above the furniture that you will have to solve later on. The radio on top of the furniture is also an important piece of the puzzle. Take note of it as well. Click on the right arrow to move to the next room
- You will see a bookshelf. Open the top drawers to get the note, then choose the book on the right from the shelf. Select ‘Look’ in your inventory. Read through the book, making a note of the people’s names and the outlines. There should be some information on four individuals. We will need them later.
- Returning to the room view, choose the blue cabinet and then open the top drawer. Collect the music note and play it on your walkie-talkie in front of the fireplace. Tap ‘Grab’ after selecting it from your inventory, then select ‘Look’. Tap the arrow until you reach the correct channel and can hear the music.
- Return to the fireplace-filled room. Examine the fireplace more closely. While your walkie-talkie is playing music, get it from your inventory with the ‘Grab’ option and then tap the fireplace. An arm with a message will emerge. Pick it up to put it in your inventory.
- Go back to the room where there is a radio. To get there, you’ll need to turn around and go back to the room with the stairs. Once you are there, turn to the right again.
- Look at the 3×3 grid’s increasing numbers to see how they correspond to the numbers 1 through 9. Take a look at the note in your inventory to see a 3×3 grid that looks similar. It contains nine symbols.
- Make sure that you can hear a sound from your walkie-talkie and then tap on the radio. What you need to do is find the station that is playing the same tune as your walkie-talkie. Use the dials on the left and right to change the station until you find it. Write down the frequency number that you found as you are going to need it in order to solve the next puzzle.
Also check out : Top 7 Dwarf Fortress Mods and How to Install Them!
- Return to the first room and from there go through the brown door to the fireplace. If you turn right, you should see the front door and a cupboard on the right with a padlock. Select ‘View’ on it. To open it, you are going to need a 4 symbol combination. This is where the frequency number that you found before will come into play. The numbers indicate the position on the 3×3 grid. Get those 4 symbols from the corresponding positions from the note. Open the cabinet doors and tap on the red box on the bottom right to take a closer look.
- Another puzzle to solve. You see the buttons are marked with dots (1 to 5). What you need to do is pair up the buttons, so the ones with the same number are connected in the same line. Once you do that, the box will open. Pick up the white diamond and put it in your inventory.
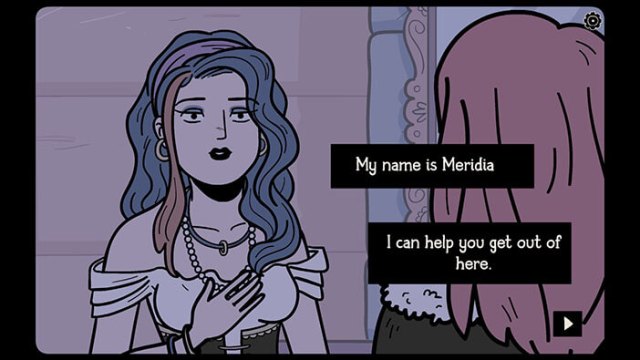
- Tap on the left arrow to return to the fireplace room where the portrait is. View the portrait on the wall. From your inventory, select the white diamond that you just picked up and put it on the empty slot at the bottom of the frame. The portrait will begin to change colors, and you’ll be teleported into the painting. You’ll notice a woman standing there, tap on her to start the interaction. You’ll find out that her name is Meridia, and she needs your help to find her cat. Every time you tap the painting in your inventory slot, you can switch between the ‘real’ world and the ‘painting’ world. For now, you need to stay in Meridia’s world and go to the left.
- Select the blue door, open it, and then go through it. On the left of your screen, there’s a cabinet. Open both doors. Inside the left compartment, you’ll find a cauldron. Pick it up and add it to your inventory. Back to the room view, you’ll notice there’s another cabinet right above the sink. Open both drawers. You’ll find a “Carrot” and a “Tuna Can”. Pick up both these items.
- Head back to the room with the wall clock. Select the arrow on the bottom left of your screen to leave the room and go to the room on the left. There’s a drawer that you need to open right under the clock. After that, open the brown door and head into the next room. You’ll notice that the staircase is broken. Select the right arrow to move to the next room.
- You can see a white door and a note on the wall next to it, but for now, select the right arrow again to move to the next room. You’ll find an open brown door to the right, and a piece of furniture on the right. Open all the drawers and pick up the “Gardening Tool” to add it to your inventory. Also notice a mark inside one of the drawers. Take a note because we are going to need this clue in order to solve another puzzle. Go back to the room with the white door. It’s on your left.
Check out our complete – How to Solve The Seven Wonders – Crisis Core: Final Fantasy 7 Reunion Guide!
- Take a closer look at the map on the wall right next to the door. Take a note of the X mark. The map represents the area right outside the white door. Open the door and go through it.
- You’ll notice a branch sticking up right in the middle of your screen. Tap on it to view it, and you will discover the first OWL. If you select the cog icon (settings), you’ll notice that there are 9 OWL symbols in total.
- Tap on the left arrow to move into the next area. Behind the rock there’s a flower. Pick it to add it to your inventory and move to the left again.
- It’s time to dig that X location that was marked on the map. Select the “Gardening Tool” from your inventory and select the ground area to the left of the door. Pick up the “Purple Key” from the hole you just dug and add it to your inventory. Once you do that, go through the open door.
- Once you are back inside the house, go through the brown door to return to the room where Meridia is. You’ll notice a blue desk to the right. Select the “Purple Key” from your inventory and tap on the keyhole to unlock the drawer. From your inventory, select the “Blue Book” and place it right next to the scarp of pictures in the drawer.
- In order to solve the puzzle, you need to assemble everyone’s photo by putting the right pieces together. First will be Juan Manuel, then Alejandra, Pablo and finally Camila. Once you put correctly together all four pictures, you’ll notice that each character is looking at a specific symbol. You need to take notes of them as they are clues to help us solve another puzzle.
- Go back to the room view and head upstairs. In order to do that, you need to move two rooms to the right and go through the brown door. Once you are at the stairs, tap the up arrow. You’ll notice a lock. Take a closer look at it. This is where the symbols that you found earlier will come into play. To unlock the padlock, you need to put the symbol that each character was looking at in order. Once you do that, the padlock will unlock and the door that leads to the attic will unlock. Proceed through it.
- Once you are in the attic, see a totem on the right of your screen. You can ignore it for now and just move to the next location to the right. There are four wheels hanging from the wall, and a blue cabinet on the right. Open the cabinet and pick up the “Oil Can” and a “Four Dice” to add it them to your inventory. Once you do that, you can go to the next room to the right.
- There’s a blue table in this room and on top of it. There’s a red book. Take a closer look at it. You’ll realize that the book is locked, but Adria seems to know something about the symbol that’s on the cover of it. Tap on the right arrow to move into the next room.
These are the best Top 6 Victoria 3 MODs and How To Install Them.
- In this room, you’ll notice right away a sheet hanging from the wall. Remove it to unveil yet another portrait. Once you do that, your hero will say that she has seen this man before. She remembers the man on the portrait staring at her. Tap to go through the stairs, then press the left arrow once you are in the next room.

- You should now be in a room where’s a blue cabinet on your left. Since it’s a rusty one, you will need to use the “Oil Can” from your inventory on it. Once you do that, open the drawer. Inside, you’ll find a Skull that you need to add to your inventory.
- Tap on your first inventory slot to teleport into “Meridian’s World”. Once you are there, select the right arrow key to move to the next room.
- You should now be in the room with the big clock. The cabinet that you opened earlier, it’s a placeholder for the skull that you just acquired. So place it there and you’ll notice right away the skull’s eyes start to glow. It will reveal yet another puzzle on the wall right next to the clock.
- Select the right arrow twice to move into the room where Meridia is. Get the dice from your inventory and give it to Meridia. She will throw the dice, and you need to see the number on it. Every throw of the dice is totally random, so you should write down the results, as they are clues to help us solve a puzzle. Time to head back to the room with the clock. Select the left arrow key twice to get there.
- Once you are in the room, check the puzzle on the wall right next to the clock. You will have to enter the dice results, exactly in the order Meridia rolled them. Once you’re done that, select the OK button. The door should unlock, and you’ll be able to pick the Red Diamond and add it to your inventory.
- Tap on the first inventory slot to teleport back into the “real” world. Select the right arrow to move to the next room, then the up arrow. You should be in the attic. From there go one room to the left, and you should be in the room with th man’s’ portrait. Examine the portrait and place the diamond that you just found in the slot below it. Once the action is complete, Adria will teleport into another world.
- You’ll see the man of the portrait standing right next to you. Talk to him to start the interaction. He will introduce himself as Dellan, a great magician, and he will ask you to help him find his hat. Even though he can’t leave, he can provide some help he says. You’ll notice that the first inventory slot is now a portal to Della’s world. Similar to Merida’s portal, whenever you tap on it, you will teleport to that realm.
This brings us to the conclusion of the first segment of our comprehensive walkthrough of the Nowhere House. In the next and last part of our guide, we will continue our story exactly from this point.


Published: Jan 5, 2023 01:40 pm