Mods have always been a big part of Minecraft, and if you mostly play the Java Edition, you’ve probably tried at least one mod in the past. With version 1.19 of Minecraft available now, most mods are still in the process of moving over their infrastructure to be compatible with 1.19. Today, our mods guide will show you how to add mods to Minecraft 1.19.
Adding Mods to Minecraft 1.19
Since Minecraft’s original PC release back in 2011, mods have become much, much easier to manage and install. It used to be a nightmare trying to get certain mods to work, but now it’s as simple as the push of a button.
Back in the old days, you used to have to edit Minecraft’s data jars manually to add mods. You would have to open up the jars and then place the correct mod files in and hoped everything worked.
Now, you don’t have to worry about that! The easiest and our favorite way of installing mods for Minecraft is to use a launcher that takes care of it all for you. There are a number of launchers built specifically with mods in mind, but our favorite is easily GDLauncher.
The GDLauncher is a simple, open-source launcher that can automatically download mods for you from the built-in mod browser. You’ve probably heard of other popular launchers like CurseForge, but we recommend GDLauncher instead because it doesn’t have any ads.
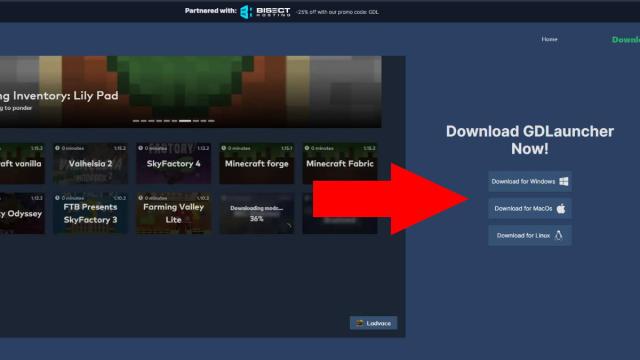
So, let’s get started and install a mod! First off, download GDLauncher from the website we linked earlier. GDLauncher is available on Windows, MacOS, and Linux.
Related | How to Download and Play Cracker’s Wither Storm Mod for Minecraft
Once it’s downloaded, go and run the application. You’ll be prompted to log in with your Mojang or Microsoft account if you’ve merged your account, which you should have done already by now.
Now that you’re logged in, you’ll be on the main menu, which should be empty. This is where your instances of Minecraft will go, once you install one with mods. Let’s do just that, so click on the plus in the bottom left corner.
You’ll be taken to the Add New Instance screen. You should see four buttons near the top: Vanilla, CurseForge, FTB, and Import Zip. Here’s an explanation of all four options:
- Vanilla lets you choose from all the normal, official versions of Minecraft.
- CurseForge lets you browse the mod packs that are listed on CurseForge’s directory. This is usually the starting point for most players.
- FTB is another popular mod directory, focusing on large-scale mod packs.
- Import Zip lets you install individual mods by importing the downloading zip file.
If this is your first time adding mods, let’s take the simple route and install a mod pack. This is usually where first-time mod players start, because they find a cool mod pack that they’re interested in trying. Click on the CurseForge tab, and you should see a list of mods.
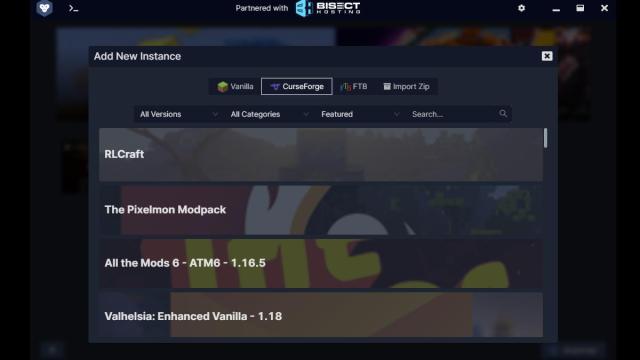
You’ll see plenty of popular mod packs, including Valhelsia, RLCraft, Pixelmon, and more. Simply choose the one you want, then click on Download Latest. If you want a specific version of the mod, click on Explore / Versions instead.
If you want mods for strictly 1.19, make sure to click on the All Versions dropdown button and set it to 1.19. Just be aware that since 1.19 is the newest version of Minecraft, there aren’t many mods for it yet. You’ll have to wait for existing mods to be updated for compatibility reasons.
If you don’t want to install a mod pack, you can also just install individual mods using the Import Zip function. Head over to the CurseForge mod directory, and you can download individual jar files.
You’ll need to zip up your jar files manually using an application like 7-Zip, so make sure to download that if you haven’t already. Simply zip up all your downloaded mod jars into one zip.
Back in GDLauncher, click on the Import Zip button, then locate your newly created zip file. GDLauncher should automatically create a new instance with all the individual mods you put inside the zip file.
And that’s it! You’ve successfully installed a mod for Minecraft version 1.19. We hope you enjoy your modded experience, and if you have any other questions, let us know in the comments below!


Published: Jul 21, 2022 03:35 am