
A new Ragnarok Online experience has come to mobile! Enter Ragnarok: Labyrinth, a new style of idle/incremental game featuring all of the monsters and jobs from the legendary Ragnarok Online MMORPG. Create your hero and set out a new chapter in the Ragnarok world. There’s plenty to do in this world so naturally there’s plenty to cover, so we’ve got some helpful hints for you right here in our Ragnarok: Labyrinth tips and tricks strategy guide!
Complete Main Quests
When you first start out, Ragnarok: Labyrinth will utterly bombard you with its overflowing interface and tons of on-going events, as per the norm for these kinds of games. Wade through all of that because your main focus early on should be completing the main quests, which are shown at all times at the bottom left corner.

The reason being for this is that base and job experience obtained from fighting monsters drops off very quickly, so in order to make progress in a decent amount of time, you’ll need to rely on the big experience bonuses from completing the quests. These quests will also slowly unlock the rest of the game to you, granting you access to advanced hero building options, new dungeons, and more.
In fact, in some instances it’s usually better go to an earlier area if the monsters in your current area are too tough. It’s better to be able to defeat weaker enemies faster than it is defeating stronger enemies slower.
Building your Hero
When your base level goes up, you’ll acquire stat points to improve your character’s attributes. By default these points are automatically distributed in accordance to your job’s recommended stats. Unless you know what you’re doing or you’re going for a specific build, we recommend leaving stat distribution set to auto.
When your job level goes up, you’ll earn skill points. With the exception of your starting Novice job, each job has four skills: two active and two passive. You are free to distribute the points you see fit, but as a general recommendation try to focus on a few active skills. Focus on maxing out your favorite skills and don’t try to get all of the actives since for a while you’ll only be using two at a time. Passive skills are active at all times, they don’t need to be equipped.
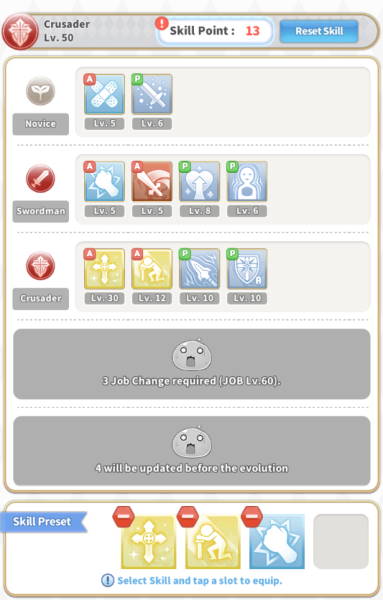
As of now, your character can get their 3rd job change at job level 60. If you invested too many points into skills from your earlier jobs, don’t worry! You can reset your skill points, and the first time is free. We highly recommend getting to your 3rd job advancement before doing this, as you’ll be able to build your character with all of your available skill options.
Related | Ragnarok: Labyrinth Special Event Quiz Answers
Gear and Cards
As you progress through the quests, you’ll naturally receive gear from boxes and defeating MVP monsters. Gear can range from one to five stars, with five being the best. You’ll have to upgrade your gear to certain levels for specific quests, so make sure you do that to keep up with the monsters. In fact, that should be the only time you upgrade your gear – try not to spend too many resources on low rarity gear, as you’ll receive higher rarity gear naturally as you progress.
The game will also teach you about dismantling old gear to get stardust. This is an important process as you need the stardust to craft the higher rarity gear, but don’t dismantle all of your gear, as 1-star gear is actually used as the basis for almost every crafting chain. It’s helpful to keep a few copies lying around if you’re planning on making multiple weapon types.
Try to decide what on you want to use once you get to your highest job class. The reason for this is because the higher rarity gear must be crafted and it takes a long time to get the resources needed, as they are obtained mostly through the dispatch mechanic (see below).
Card slots unlock for gear once they reach levels in intervals of 10. Monster cards are obtained from the labyrinth areas, in which you get five free entries every day. It’s important to head into the labyrinth and collect cards, as they can be used to further power up your gear in various ways.
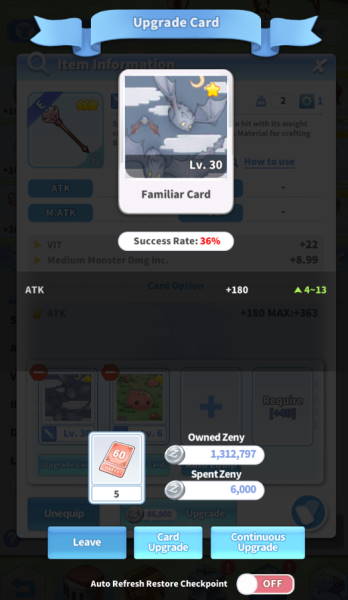
Cards can be upgraded just like gear can, but you have to use card upgrade tickets in addition to the zeny cost. These are dropped from MVP monsters and you can earn them from events like the prize wheel. Once you get a card high enough, card upgrading becomes a major pain in the butt due the success chance gradually dropping lower and lower.
Once a card’s upgrade chance drops below 40%, you will start to waste a lot of upgrade tickets. Be sure that you’re only getting this far on higher rarity cards, as it’s not worth the trouble for the lower rarity stuff.
Related | Ragnarok: Labyrinth Coupon Codes
Maximizing Sharevice Time
Your sharevice allows you to recruit other players who aren’t actively playing the game at the moment. You start with only a few slots, but you’ll unlock more slots as your job level increases. You can only use the sharevice only a certain amount of time – you get free four hours every day and you can use magic hourglasses to add more time if you want.
However, keep in mind the speed at which your remaining time ticks down depends on how many players you’ve recruited. If you’ve recruited the maximum amount of players, your sharevice time will decrease at a dramatically fast rate! Those four free hours will suddenly turn into only three hours, so be careful when you use sharevice.
Do note that your free four hours won’t be lost if you don’t use them. You can stack unused sharevice time if you don’t activate it (up to a total of 500 hours), so even if you’re not planning on playing for the day it helps to log in and get your free hours.
To get the most out of it, try to use it strategically. Don’t just leave it on all the time – if you’re trying to push through the adventure zones or get through a difficult boss, those are the best times to use it. Additionally, refresh your party every now and then, especially if you’ve been playing for a while. Chances are you’re gained a few levels, so pick up characters that are closer to your strength.

Your character will automatically go into sharing mode when you close the game. You’ll accumulate base and job experience over time, as well as materials and items. Keep an eye on your item weight limit, as you won’t be able to collect any loot if you hit your weight limit.
When you first start, you’ll be limited to only recruiting low BP characters. Once you progress far enough you gain the ability to level up your sharevice using materials found in the hunting field and central laboratory. Leveling up the sharevice will increase the maximum BP of potential shared characters, so level it up often.
Dispatch Guide
Shortly after you start your adventure you’ll unlock the dispatch feature, which allows you to send companions out to different parts of the world to gather valuable crafting materials for you. Dispatch is important so make sure you’re always sending out your companions to gather for you.
Companions can be recruited from companion tickets and boxes. You can get a free companion ticket every day, so be sure to check in and claim it at least once a day. You can also collect companion’s spirits from various events and boss rewards. Fifteen companion’s spirits can be crafted into a companion support box.
You’ll be limited to only the Prontera region when you first unlock dispatching. To unlock more areas in the region, you have to send a companion out to the latest area you have unlocked. Once all areas have been gathered from at least once, the next region will unlock.

Some areas require specific companions, so look through your options before you commit. The icon will tell you what material you’ll find, and the more companions you send out to the same area, the more of that material you’ll get.
Your dispatch priority should be like this: first, always send a companion out to the most recent area so that you can unlock more regions and areas. Unlocking all of the areas is your primary goal, as you’ll need crafting materials from all over the place. Once you have a respectable number of companions, you can start farming specific areas for materials you need.
Getting the Duel Rewards
You’ll unlock the duel mode where you can go up against another player’s character and their companions. If you win, you’ll obtain a duel piece. There’s a total of eight pieces, and collecting all of them allows you to exchange them helpful items and duel passes, an item needed for special crafting recipes.
You get five free duel energy a day, so make sure you use them. Target lower BP players for easy wins, which will nab you a duel piece. Be careful though, as other players can duel you and steal your pieces. You can only exchange duel pieces when you have all eight at once, so if you’re aiming to do this is best to do it all in one go.
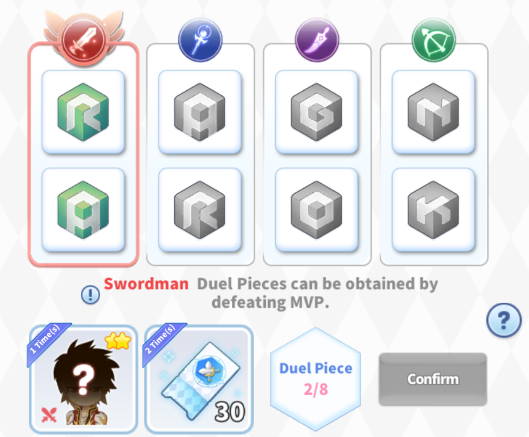
There’s a few caveats to this process that you should know. First, MVP monsters have a chance to drop at least two duel pieces that correspond to your character’s first job – swordman, mage, thief, or archer. Secondly, all monsters have a chance to drop duel energy, indicated by a percentage over the duel button. If you reach 100% duel energy, you’ll restore one duel charge.
The best way to complete a duel piece set is to start with full duel energy. Try to get two pieces from MVP monsters, then use your duel energy to get five more pieces, which leaves only one piece left. Fight through a bunch of monsters to build duel energy back up and quickly get your last piece. Alternatively, you can just use a duel recharge ticket which automatically grants you five duel energy, but these are hard to come by as you usually only get them from promotions.
You’ll receive two main quests that require you to complete a duel piece set, so you’ll have to do this eventually. It’s kind of a pain because players will steal your duel pieces if you’re not fast enough, but keep at it and you’ll eventually be able to complete the set.
What to spend Nyangvine on?
Those cute little white cat tokens you’ve been collecting here and there are called nyangvine and they’re the premium currency of Ragnarok: Labyrinth. This stuff is precious so be sure that whatever you spend it on is worth it.
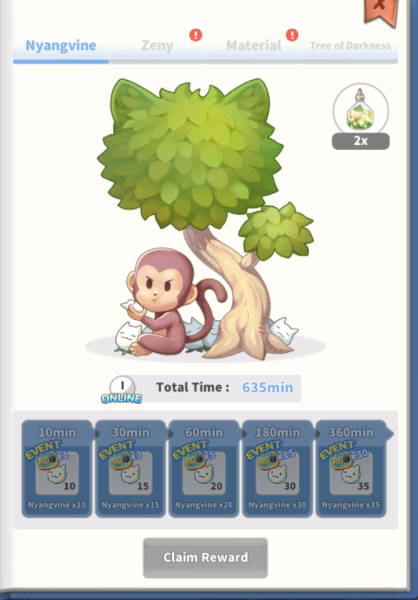
Firstly, there’s a couple of ways to get it for free. The main method is the tree, which can be accessed from the event button at the top of the screen. Every day you can stay logged into the game for up to six hours to earn nyangvine in intervals. If you play for the full six hours you’ll gain 110 nyangvine. You can also earn nyangvine from special giveaways, so check your mailbox to see if you get anything.
There are a couple of helpful thing you can spend nyangvine on. You start the game with only two active skill slots, but two additional slots can be unlocked using nyangvine. Be sure you have the MP to take advantage of this though, because an unprepared character will plow through their whole MP pool within a few seconds with four active skills.
The other thing to spend nyangvine are the rare drops in the secret shop. The secret shop will occasionally sell extremely good stuff – we’re talking 4-star gear, materials, and monster cards, things that would normally take a really long time to obtain. Of course, they’re super expensive, but this definitely worth the nyangvine.
Closing Tips
- Your starting character is defaulted to male, but the game gives you a gender change potion for free after the tutorial. This is a rather odd work around to character customization, but at least it’s free!
- Always fight MVP monsters when they appear, especially if you have characters recruited from your sharevice. They always drop helpful items like poring coins, card upgrade tickets, crafting materials, and more.
- Keep up with all of the promotional events happening right now, like the bingo star, ultimate card collector, and catch the MVP. They all reward helpful items.
- The tree is not only good for nyangvine, but also random materials and zeny. All of the tree categories cap out at six hours of online time, so make sure to claim your rewards so that the timer restarts.
That concludes our guide on Ragnarok: Labyrinth. If you have any other tips or tricks to share, let us know in the comments below!


Published: Mar 27, 2021 04:53 am