Our in-depth walkthrough of Shining Force 2 continues with part 9, which can be found on this page. To review, the events of this guide take place after those described in part 8 of the walkthrough and go on until Skreech, who is now an adult, joins your group.
Recommended Videos
Since there is a lot of ground to cover, let’s get right into it.
Preparations to Battle
- If you go north from Pacalon, you will find another fight waiting for you. Another excellent location in which to develop your character. During this fight, try to raise your level to between 9 and 10. A fight that is not too difficult. Why? Because there is a lot of room here, you should go at your own speed.
- Keep in mind that Karna and Sarah need to continue recovering so that they may level up more quickly. Take precautions, since the Wyverns may shoot fire at you with their breath. To proceed, you must vanquish each of the creatures. Apply the Cheerful Bread to Slade at this time.
- The bridge is located to the northeast. You will observe a swarm of worms devouring the bridge, as well as a young woman stranded in the center of the structure with an injured ankle. After that, you begin a battle.
- During this fight, you should strive to reach Level 10 if you haven’t already done so. It is not possible to ascend levels from the bridge because of its limited width. Caution is advised around the Master Monk. Powerful attack, as well as the ability to heal for four points, which may entirely restore HP. Kill it swiftly. To win the fight, you must first kill the Wizard.
Devil Army Commander Cameela
- As soon as the fight is over, Astral will place the girl on his back and go in the direction of Tristan. The issue, however, is that the little girl transforms into Cameela, a commander in the Devil Army. She stipulates that in return for Astral’s life, she must have the Jewel of Evil.
- After that, Astral launches an assault, and she quickly escapes. She warns that you should be wary of two more Greater Devils named Geshp and Zalbard. Then, she makes the leap into the canyon. According to Astral, they are proceeding independently and rejecting Zeon’s orders.
- Keep going till you reach Tristan. Once again, you should improve your gear in the town. Proceed all the way to the top of the stairs and enter the Caverns via the entrance at the very top. Get a hold of the Protect Milk and keep it for the time being. Follow the center path after descending the steps.
- There will be a priest standing there, preventing you from entering the shrine. According to Astral, they are required to see the storytellers. Then, the priest transforms into a demon, and a number of others arrive. You have been facing a lot of these fights recently, so another one is about to begin.
Dark Knight
- This is not a very large playing field. Consider yourself fortunate if you make it to Level 11 of the game. In most cases, I merely focus on trying to survive the fight. The combat isn’t very challenging, but since it’s being fought on such a tiny scale, it seems like no matter which way you turn, another monster is waiting to ambush you.
- You must eliminate the Dark Knight in order to proceed. Go to the entrance, where you will be greeted by Zalbard, one of the Greater Demons. He will discuss another demon who goes by the name Odd Eye.
Zalbard
- Gather as many Healing Drops as you can before you go in. Inside, Zalbard assaults. This fight is going to be quite difficult. Just give it your best and don’t worry about trying to level up or anything else. Zalbard should be your primary focus at this point. Be wary of Bolt 2, since he is familiar with it.
- Put a javelin in Chester and Rick’s hands, so the fight may be finished off more quickly. Make a way to Zalbard with your clearing. When you finally reach him, have Bowie, Peter, Gerhalt, and Jaha attack from close range, while Chester, Janet, May, and Rick strike from a distance, and Slade and Kazin attack from close range. Karan and Sarah heal.
- Another possibility is for Karna to cast Boost 2 while Peter makes use of the Power Ring. This will assure a swift and painless death. However, Kazin’s Neptune is going to be your most effective assault. Even if you die a few times, don’t worry about it, it’s to be expected.
Mitula
- He loses his life after dropping the Ground Orb. After making her appearance, Mitula retrieves the Orb. She goes on to warn that Zeon’s strength is contained inside the Jewel of Evil, but that he will be resurrected if he remains in Arc Valley for an extended period of time.
- She instructs you to search Grans for the Holy Sword. Then, she vanishes from view. Go left. Find the Critical Sword and use it to bring Taya back to life within the chamber. She will explain that Mitula has given her orders to go to the battle with Bowie in order to defend them both.
- If Taya is a competent Sorcerer, Kazin is an even better one; hence, you should merely retain Taya in the Caravan. Get some of the Power Water and try to help Slade with it. Turn around and go to the appropriate location – don’t forget to pick the Mithril.
- This room is reserved for the Storytellers. Start in the top left corner and work your way around the clock. They are going to recount a narrative about the conflict that took place between Dark Sol, Dark Dragon, and Zeon for the position of King of Devils.
- Zeon triumphs and is bestowed the title of King of the Devils; however, the other two demons were enraged and imprisoned his abilities inside the Jewel of Evil. Then, the God of Wisdom fashioned the Jewel of Light, who would choose a man to wield the Holy Sword and become its wielder. You’ll have to judge it for yourself when you read the rest of it.
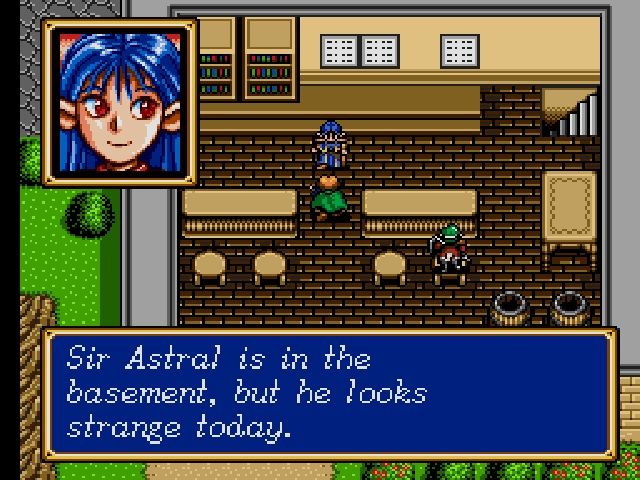
Skreech
- Leave the shrine, and then begin making your way out of Tristan. Do you remember Skreech? Well, Skreech is all grown up now and prepared to wage battle. He enlists in the armed forces. He is a lot like Luke. Furthermore, he is both a fighter and a pilot. But like Luke, his defense is subpar. Simply lock him up in the caravan and put his Great Sword up for sale.
Ok, this is it for part 9 of our Shining Force 2 walkthrough! But of course, the adventure still has a ways to go. There are more battles waiting for you! Check out Shining Force 2 Walkthrough – Part 10!


Published: Nov 30, 2022 06:47 pm