This is the 7th part of our Shining Force 2 walkthrough. This post covers everything that you need to know from the moment you approach Creed’s mansion, until after the battle with the ‘Bubbling Oozes and Rats’. Let’s get right into it.
Recommended Videos
Creed’s Entrance
- Return to the area around the Harpy Pool, and Elric will rearrange some rocks to reveal the entrance to Creed’s. This location does not include any hostile creatures, however it does have four chests.
- There is a concealed entrance located underneath the steps that go outside. After going down it, take the path to the right until you reach another concealed door.
Pass through it to reach three chests, one of which contains a Brave Apple, which you should save for the time being. There is a secret passage buried in the center of the door that goes to the right and leads down to a chunk of mithril. Proceed down the steps to leave.
A Battle Begins
- As soon as you leave the room, the fight will start.The Skeleton that watches over Creed’s Mansion should be your primary focus. Do not murder him until you have taken the Protect Ring from the Dark Madam that is standing next to him, make sure the person who will do the killing has a slot that is vacant. If you were unable to get everyone up to level 3 the prior time, you should do it now. It is imperative that you get the Protect Ring before anything else. Take out the Skeleton in the rear to continue.
Creed’s Mansion
- Enter Creed’s Mansion and get the Mithril that is located on the northeastern side of Devil’s Tail. Take the Healing Rain out of the chest on the left side of the room. Proceed into the mansion. While Mr. Creed is engaged in conversation with Fairy, his servant will prevent you from entering the room. If you attempt to enter the room via the door on the left after you have gained control again, you will be shrunk and become a part of the trophy case.
- Bowie is brought to the Desktop Kingdom by Goliath and placed there. Eric and Karna may be found just about here. Karna recommends that you talk to Ponpei, the King. If you speak with the King, he will inform you that he will allow you to enter the Floor World if you are able to vanquish the Chess Army that he commands. You are able to engage in conversation with any of the pieces on the board from the outside of the playing area.
- Take careful note of all that each of them has to say, since it may come in handy later on.
Another Battle Begins
- You should now save your current position and go down to the bottom portion of the chess board. This fight is likely going to be one of the most difficult ones you have been in for the time. The King is the focal point, much as in a game of chess.
- However, in contrast to chess, there are three queens that need to be protected. This is a spot where you may get valuable experience, but I wouldn’t worry too much about it since this fight is extremely difficult. If the King is within your range, you should use all of your resources to take it down. Because it does significant damage, Apollo from Kazin will be your most useful strike during the whole of this battle. Put a stop to it by killing the King.
Aftermath
- You will be awarded a Cotton Balloon if you are the victor in the game. Save your game and go down to the area where the guard is standing on the pen. Now that you have his permission, you may go to the Floor World.
- Proceed to the far end of the enclosure and make use of the cotton balloon there. If you keep going left, you will eventually come across a man attempting to pick up a really large ring. Keep this in mind, since it is the one and only Running Ring in the game. You will run across Randolf and Tyrin in this area. Follow the wall to the right and climb up into the large hole there. After that, you will run across some rats.
Another Fight Again!
- It’s time to fight once again. This fight isn’t too difficult, but it’s definitely worth the experience. Raise the skill level of everyone here to Level 4. The Bubbling Oozes and Rats both dealt significant damage, although not near as much as the Willard did. Because none of them rely on magic, you should not be frightened to team up against them in order to prevail.
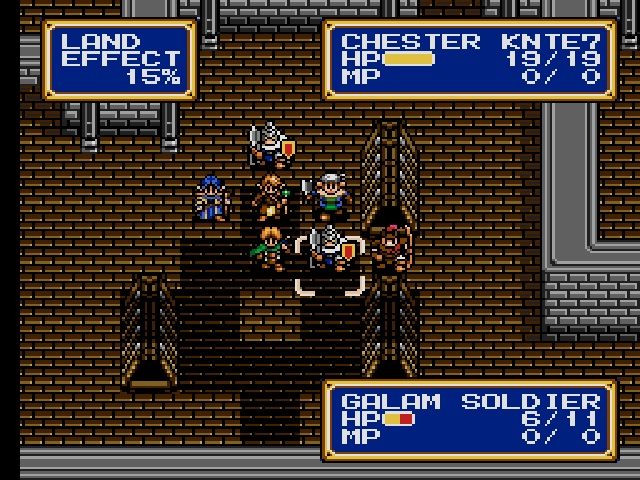
- Pay close attention to your health throughout this fight, since it is almost certain to become low at some point. Put a stop to the fight by killing the Willard. Proceed down the steps to escape the rats’ nest. Follow this path to reach the exit.
- Creed will then be seen furious at Goliath for failing to close the magic door, and you will watch this scene. Goliath departs to investigate the whereabouts of the Force, but Peter interrupts Creed at that moment. After that, he restores them to their original dimensions. Peter will inquire about Zeon, after which Fairy will step in and continue the conversation. After that, they discuss the recent events that have taken place. Then, Creed walks away to speak with the Evil Spirit. Keep up with him. You will see the Evil Spirit. Creed is going to inquire about finding Zeon and finding out what he is up to.
After one unsuccessful attempt, Bowie reveals to him the location of the two Jewels. Next, Evil Spirit discusses the Devils that descend from the heavens. He is still unable to see Zeon, despite the fact that Zeon has not fully healed. When Evil Spirit is going to inform about Zeon’s Power, Zeon channels to them and says that he will restore Elis to Bowie if Bowie takes the Jewel of Evil to Arc Valley. After then, the evil spirit blows up.
New Party Member
- Creed will lead you out. Talk to Fairy while she’s at the door, and she’ll come with you. You may now choose one other person to come with you. In most cases, I will take Karna and then hold off on becoming a Master Monk until later. Tyrin is an adept practitioner of powerful magic in his own right. Randolf is powerful, yet he moves quite slowly. Eric is not worth your time or effort in any way. Karna is the one I’ll be using for the sake of the tutorial. It is imperative that you get the Running Ring from its hiding place behind the chair in the room on the left. When you are about to leave Creed’s Mansion, Creed will rush out and insist that the Oddler remain behind. Oddler nods in agreement, and then proceeds to leave.
- Proceed to the front door and step into the caravan. Remove Luke and replace him with Karna. Don’t promote Karan yet. There is a second ball of the Vigor kind. However, you may want to consider giving Sarah the Running Ring and giving her the Protect Ring instead.
That’s all for our Shining Force 2 walkthrough. The part seven at least! Because, of course, our adventure isn’t over just yet. There’s still ways to go! Check out the next part if you need any help with the game.


Published: Nov 30, 2022 10:30 am