This page contains Part 12 of our in-depth guide to Shining Force 2, which can be found below. Consider this guide to be a continuation of the tale, from the point where part 11 left off, which was immediately after the conflict with the Red Baron.
Since there is a lot of ground to cover, let’s go straight into the meat of the discussion.
Trip To Galam
Get to the river up north before you make the trip to Galam. A cleft may be seen in it. Create a passage to the Dwarven Town by using the Drystone. Collect all your mithril and go inside. Quite a few items may be found within. Healing Water, a Demon Rod, and a White Ring (which Bowie should give to Peter). Your quest now is to locate the Dwarven Blacksmith. Give him all of your mithril, and he’ll build something useful out of it. It might take a while.
Create a Mist Javelin for Rick, a Gisarme for Slade, and a Levanter for Bowie; a Grand Shot for Janet and May; a Rune Axe for Jaha; giant gloves for Sarah, Karna, and Sheela; and a Levanter for Bowie. You’ll need 9 Mithril shards for that. It’s a good time to use save states if you’re playing the game on an emulator.
Travel to Galam, which is located in the south. Get the Healing Water from the vault and the Evil Shot from the bushes. Put some money down and take a trip. Zeon and Geshp’s conversation will immediately cut to them. According to Geshp, the demons of Zeon had more raw might, but Bowie and the Force were able to outthink them with their superior intelligence. The enraged Zeon orders Geshp to eliminate Bowie or face the consequences himself. Odd Eye appears and declares that he will murder Bowie if Geshp is unsuccessful.
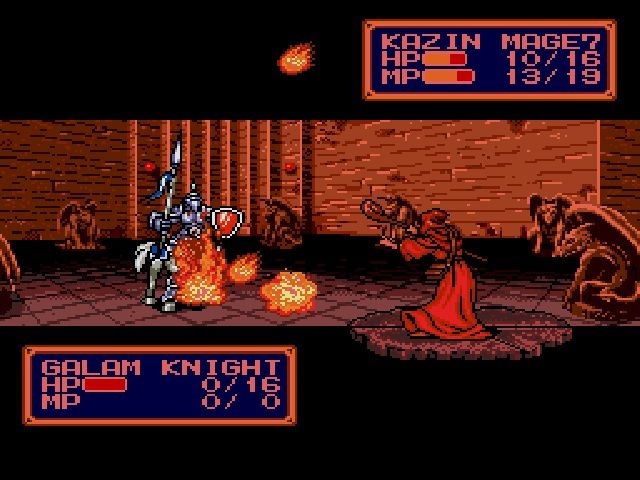
Gesph Encounter
Leaving the castle will be your last encounter with Geshp. There aren’t a lot of troops involved in this skirmish, but Burst Rocks do start to show up after a time. Don’t bother attacking them or getting too close to them. That’s the trigger they need to explode with anger.
Because Slade has Gisarme, we’re more equipped to take on this challenge. Keep in mind that the White Ring of Bowie’s can cast Aura 2 on demand, saving the day if your health ever drops dangerously low. Don’t stress about your level or the other creatures. Just charge in and start attacking Geshp. You may strip Geshp of his abilities after you’ve defeated him. He is released by Astral. Zeon “fires” Geshp for failing to murder Bowie after Geshp thanks Astral and flees.
Travel to Yeel in the west. Lemon is likely to be found there attempting suicide. If you take the time to play the piano in the bar, you may just hear a door crack. Visit the temple, where you will be misidentified as devils. The stairwell door opens, and a guy emerges.
Astral informs the Priest and the guy of the predicament. Chaz, he says, is the son of Sir Hawel, Kazin’s teacher. They discuss stuff in the basement. To illustrate his point, Astral brings up the Holy Sword. While browsing certain books, Chaz discovers that the most crucial chapter has been removed. Follow the secret passage down below you to reach some Evil Knuckles.
Chaz Joins The Party
If you have another conversation with Chaz, he will decide to join. Don’t let him out of the Caravan. In order to defeat Bowie, you must first get a Quick Chicken. Healing Drops should be stocked for everyone, even Caravaners. Move on. Get in touch with Lemon down there. When you go, Lemon will come out and beg if he may come along. We need Jaha gone.
Toss the Dark Sword to Lemon and keep the Rune Axe and Quick Ring. Now give whomever you’re fighting the Brave Apples, May the Protect Milk, and Karna the Running Piment. If you go south, you may see a bunch of demons plot Bowie’s death.
You should easily win this battle. Raise everyone’s level to 20 and start shooting at the Hydra. Really, there’s nothing to it. When you’ve finished using it, proceed to the Holy Sword Shrine in the southeast.
Proceed inside and down the ramp.
Bowie will be drawn to the location of the Holy Sword by the power of the Jewels. Manually searching for it will provide the Force Sword.
Follow the mountain’s contours to a small clearing east of the Ancient Tower. Proceed around the back of the skull to seize the Evil Lance. Once you’ve gotten the mouth to open, you may enter with the Force Sword. Get all your Healing Waters and Healing Rains together and bring them along. Proceed to the brain when you are prepared to do so.


Published: Dec 1, 2022 01:45 pm