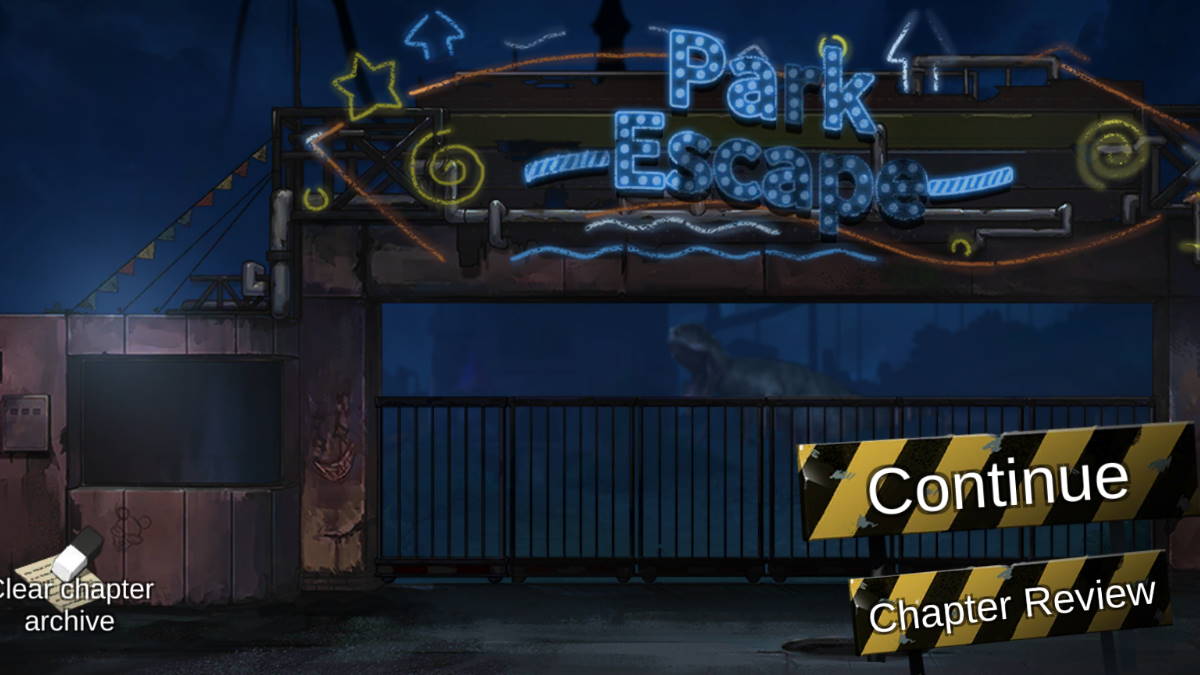
Welcome back to Park Escape! Our agents have found themselves in the middle of the suspect’s base, and now they are on the chase. Many mind-bending puzzles await you in this chapter, so let’s get started with our chapter 5 walkthrough on Park Escape!
Previously: Park Escape Chapter 4 Walkthrough
1st Floor Lobby
Examine the potted plant to find a key. Examine the desk and take the ballpoint pen, then examine it closely and tap on the head to take out the refill. Look at the orange suitcase on top of the table in the middle of the lobby, and use the pen refill to pick the lock. Take the resistor and work permit. Examine the bottom part of the card reader and use the the key to unlock the panel.
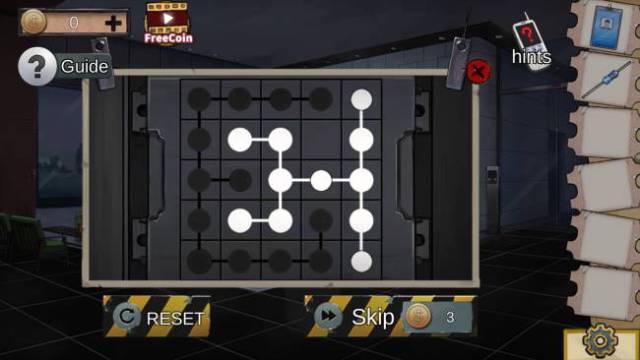
Tap on a tile to set it to either black or white. You’ll need to set up the tiles like so – that last empty space should be a black dot.
The card reader should be functional now, so use the work permit on it.
1st Floor Elevator Lobby
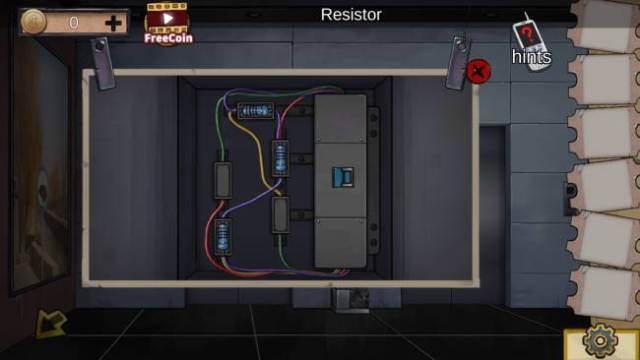
Take the scissors jammed in the elevator doors. Examine the ashtray and grab the second resistor, while looking at the peculiar circles with the numbers in them. Examine the painting on the left wall and use the scissors to get a third resistor and a rocket screwdriver. Open the elevator button panel with the screwdriver and place the resistors in as shown and flip the switch.
Power should be restored now, so go ahead and hit the down button on the elevator panel.
Inside the Right Elevator
If you examined the clock on the reception desk, you may have noticed a sketch of a ballerina. On the elevator walls, tap on the ballerina’s legs and arms to move them into this position:
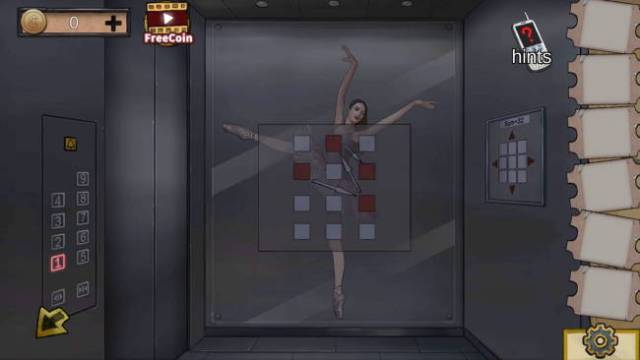
You’ll see a peculiar pattern appear. Take the elevator up to the ninth floor.
9th Floor Lobby
Examine the debris on the right side of the room to get a square block and a rubber bucket. Go back to the room, then tap on the brown piece with a stone base to get half of a statue.
1st Floor Lobby
Examine the couch in the middle of the lobby and move the cover aside to reveal a box underneath. Examine it and use the square block to start a puzzle. This puzzle isn’t too difficult and you can pretty much brute force it since the blocks can be exchange with any other piece in the order. Start with the heart piece on the left side, then diamond, spade, and then finally club.
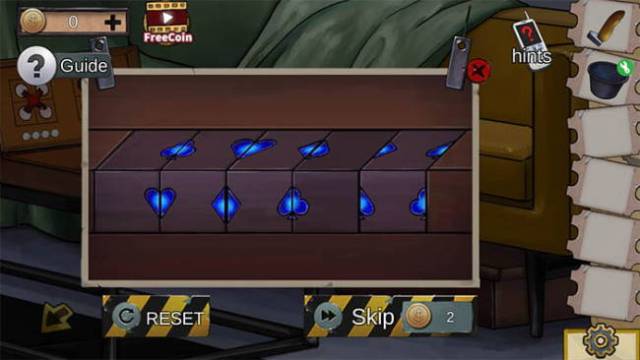
You’ll get a battery for your troubles.
9th Floor Lobby
Examine the little case on the top of the scaffolding on the right side of the room. Place the battery in the slot to activate the keypad. You’ll start in the center, and you can move the highlighted box up, down, left, or right. Your goal is to add up to 32, as indicated in the elevator. Follow this order:
- 4
- 5
- 4
- 2
- 4
- 7
- 4
- 2
Take the cement and stick. Examine the debris on the ground again and use the stick to fish out a key. Use the key to unlock the door. Grab the barreled water, and then examine the keypad. The circles with the filled in quadrants are to give you a clue – you need to match the ashtray numbers with the quadrants. The code is 3689.

You’ll get half a statue. Combine the rubber bucket with the cement mix and water to get a bucket of cement. Combine the both halves of the statute with the cement mix to get the repaired statue.
Examine the suspicious rock with the indent and place the statute in the indent to raise the shutters. The door is locked with a keypad, but remember the strange diagram in the elevator? The red squares are supposed to reference the telephone keypad back in the 1st floor lobby, so the code would be 4926.
Bowen
Painting Room
The agents will be separated once more. Bowen will be trapped behind a glass security door with an input, but he has no clues at the moment so switch to Qiuyu.
Qiuyu
Graffiti Room
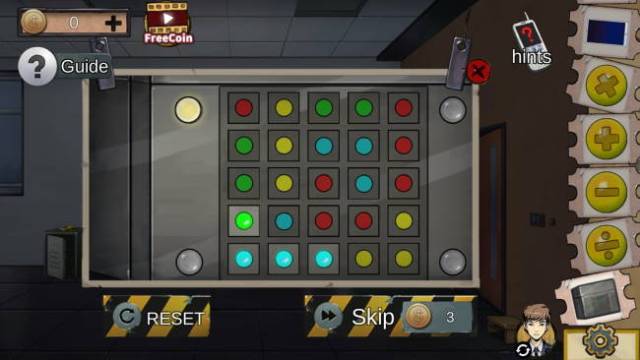
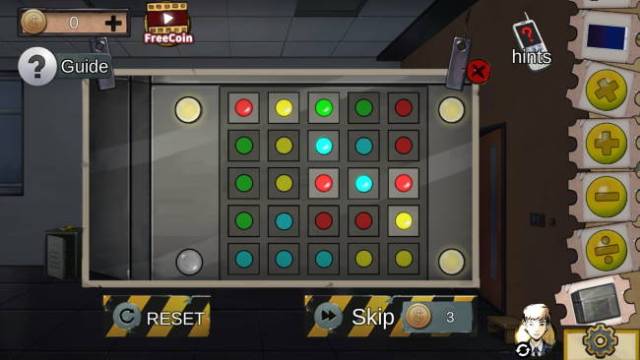
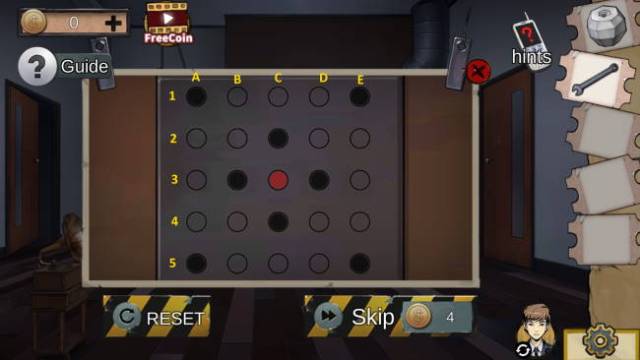
Examine the safe in the back of the room to start a dot puzzle. Follow these steps to unlock it:
- left column down
- bottom row right
- top row left
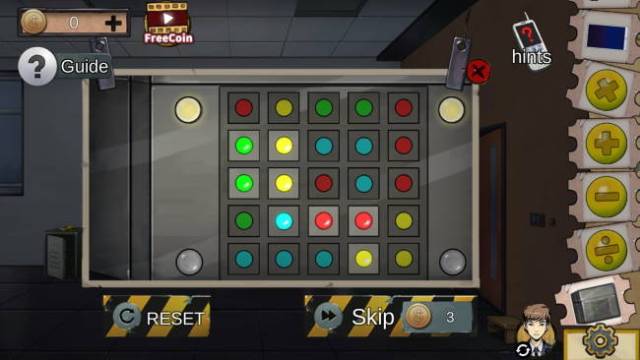
The first light will turn green. From here:
- left column up
- bottom row left
- right column down
- top row right
- middle row left
- left column up x2
- middle column up x2
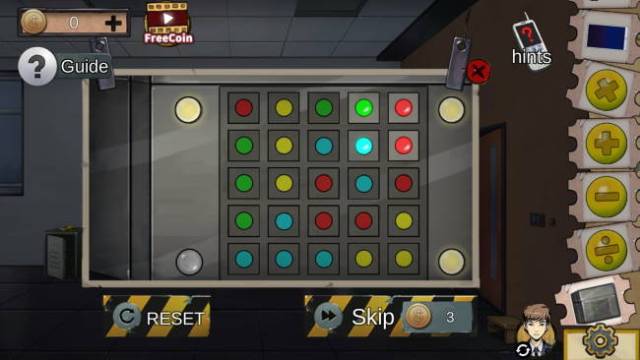
This turns the second light. Continuing on:
- left column down x2
- right column down x2
Grab the key. Examine the shelf with the flower pot on it and tap the pot to slide it aside. Use the key on the lock that’s hiding underneath the pot and grab the plastic card. Use the plastic card on the graffiti scribbled on the wall and line it up with the little lemon cut to see a string of letters: CPLF.
Bowen
Painting Room
Input CPLF into the keypad and the gate will disappear. Slide the cabinet open and grab the lever. Examine the painting and look closely: you’ll see parts of the painting flash for a brief moment. You need to hit the buttons that match the color of the fruit flashing. There are seven button presses you need to input, and this sequence is randomized every time you examine the painting. You’ll get half of a key. Move through the open door.
Ball Pit Room
Take the red ball from the ball pit, then examine the stink and grab the razor. Combine the ball with the razor to get a cut ball and the other half of the key. Combine the key halves to get a tubular key. Combine the cut ball with the razor one more time to get a star. Examine the penguin doll in the back and open its mouth to get a piece of paper.
Examine the pedestal in the middle of the room and place the star in the indent. Examine the four dials below the pedestal and set them like this, making sure to turn the top left dial one more time.
With the star placed, the pedestal will project a interesting number pattern on the wall.
Painting Room
Examine the small panel on the left wall and use the tubular key to activate it, then press the big button.
Ball Pit Room
Examine the door on the right and punch in 7851 – the down arrow is to let you know it’s the code on the wall, just upside down.
Statue Room
Examine the panel below the phonograph and you’ll see four buttons with icons on them. Tap on them to cycle through the icons, and set them like this:
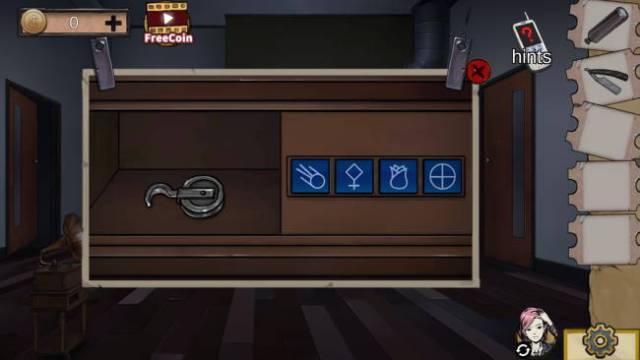
You might recognize these symbols from Qiuyu’s side of the beginning room. Get the pulley.
Qiuyu
Graffiti Room
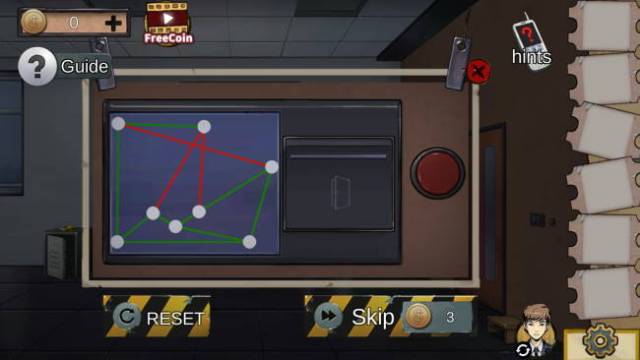
Examine the panel by the right side door and you’ll see there is a new puzzle on it. You need to rearrange the dots in a way that none of the lines are intersecting, and here’s one quick way to do it. Make sure to drag the top middle dot down below the red line.
Qiuyu’s Ball Pit Room
The next room will look pretty familiar with a ball pit and a penguin doll. Take the rope from the penguin and push it aside to reveal a hole in the floor. Examine the bag in the background and take the tablet and Chinese style key.
Take a closer look at the tablet in your inventory. Drag the bell in the middle of the screen and position it all the way to the right. When the bird on the bell is near the top, tap on the red switch to make the bird hit the bell and emit a sound wave. The sound wave will travel between bells – wait until it hits the middle bell, the quickly drag it all the way to the left. It may take a couple of tries, so hang in there. When you’re successful, the tablet will display a bunch of colored spheres.
Graffiti Room
Examine the shelf and use the chinese style key on the lock and get the iron box. Examine the iron box and you’ll see a bunch of colors – you need to repeat the colors you saw on the tablet. A bulb will light up when you input a valid combination. Here are all the patterns:
You’ll get a bottle of lubricant.
Qiuyu’s Ball Pit Room
Examine the ball pit and grab all of the yellow balls. Examine the door and you’ll be presented with a formula but you have to fill in the math. From left to right, slot in the multiply (X), then addition (+), and finally division (/). The bar will unlock, but it’s old and rusty so use the lubricant.
Tree Room
Examine the conveyor belt and place the rope on it to send to Bowen.
Bowen
Statue Room
Grab the rope and combine it with the pulley. Examine the conveyor belt and place the lever in the side mechanism, then place the pulley and razor on the conveyor belt and send them to Qiuyu.
Qiuyu
Qiuyu’s Ball Pit Room
Use the razor on the ball pit to cut it open and get the plaster apple.
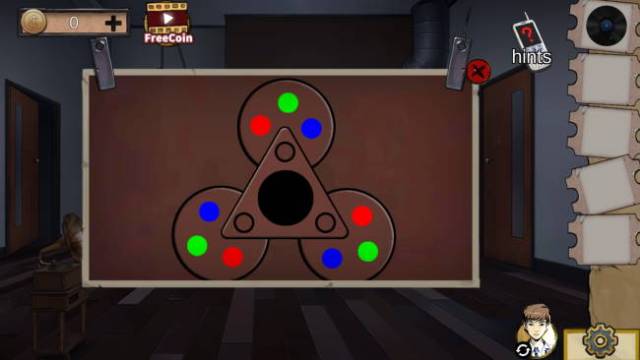
Tree Room
Use the pulley on the little mechanism next to the tree to attach it. Activate it to lift the tree then grab the wrench underneath. Examine the panel under the gramophone to activate a circle puzzle.
Follow this order carefully: A1, E5, A2, B1, B3, B5, C1, B2, A2, C2, D1, A1, A3, A4, E3, C4, D4, D5, D3, D2, D3, D2, D1, D5, D1, D3, D5, D1, C1, B1, A1, B1, A1, C5, C1, C5, C1, C2, B1, D1, C5, E5, A5, B5, B4, B5, B4, E4, D4, C4, B5, D5, E5, D1, C1, D2, then tap the red circle in the middle. Take the plastic dipper. Send everything back to Bowen.
Bowen
Statue Room
Place the apple in the statue’s hands to get an access card. Use the wrench to tighten the pipe.
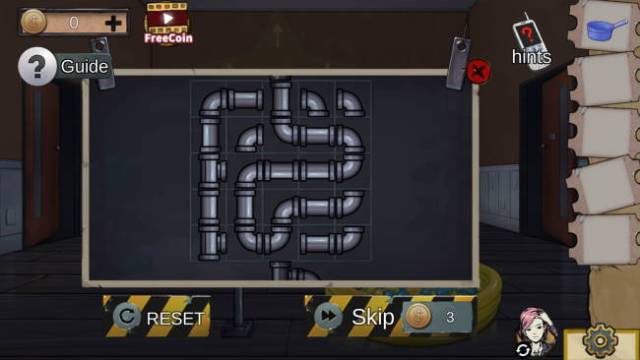
Ball Pit Room
Use the wrench on the sink cabinet. You’ll have to rearrange the pipes, starting from the top drain all the way to the bottom. Here’s the solution, but make sure to rotate the bottom middle pipe.
Use the plastic dipper in the sink after you turn the lever to get some water.
Statue Room
Send the plastic dipper filled to Qiuyu.
Qiuyu
Tree Room
Grab the plastic dipper then go to the Ball Pit room.
Qiuyu’s Ball Pit Room
Examine the hole in the floor that the penguin doll was covering and pour water into it. You’ll get a key from the ball in it.
Tree Room
Use the key on the cabinets above the conveyor belt to get salt. Send the salt to Bowen.
Bowen
Statue Room
Use the salt on the vinyl to defrost it. Play the vinyl on the gramophone and you’ll see a code flash: 4806. This code is for Qiuyu’s door – note the green color of the numbers. Take the vinyl back and send it to Qiuyu.
Qiuyu
Tree Room
Play the vinyl in the gramophone to get another four digit number: 5492. As you can guess this one is for Bowen’s door. Examine the marking on the door and you’ll see it lit up with color now.
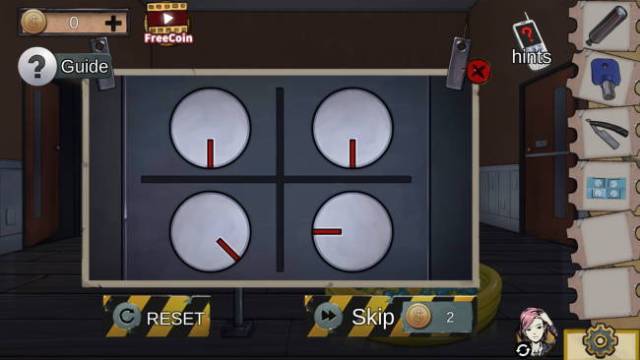
You have to set the triangles to certain colors. Note the “B” above the panel – you need to set the middle circle on the door to black so rotate all three smaller circles until no color is selected.
Bowen
Statue Room
Now you have to do the same for Bowen’s door, but his must be set to white. Set the three circles to blue, green, and red to get white.
Congratulations, that concludes chapter 5 of Park Escape!


Published: Jan 22, 2021 02:47 am