After Bowen is knocked unconscious by a unknown perpetrator, it’s up to Qiuyu to discover the truth and find out where Bowen was taken in the exciting second chapter of Park Escape! We’re here to walk you through the entirety of Park Escape‘s second chapter with some puzzle tips and guidelines.
Part 1
Carriage
You’ll be in front of a carriage. Examine the haystack in the background and pick up the pitchfork, then use it on the darken patch to uncover a hammer. Examine the side of the carriage and use the hammer to break it open, revealing half of a crystal and a briefcase with a code lock. Turn around and go to the Storehouse.
Storehouse Entrance
Examine the poster on the power line pole and grab the key. Go back to the Carriage.
Carriage
Use the key you just got on the gate in the front to unlock it.
Security Fence
Examine the case on the ground and punch in 2622 to unlock it and acquire a utility knife. Use the pitchfork on the security mesh to tear a hole through it, then return to the Storehouse Entrance.
Storehouse Entrance
Use the utility knife on the tied up crystal on the left side of the screen. Combine the two halves to get a hexagonal crystal and return back to the Security Fence.
Security Fence
Place the hexagonal crystal in the scarecrow’s badge slot and receive a mysterious test tube. Return to the Storehouse Entrance.
Storehouse Entrance
Examine the shutters and you’ll see a colored tile puzzle. Place the test tube in the circular slot on the right to activate the puzzle. Your objective here is to clear the colored tiles by matching them with tiles of the same color. Tiles can be moved to adjacent tiles.
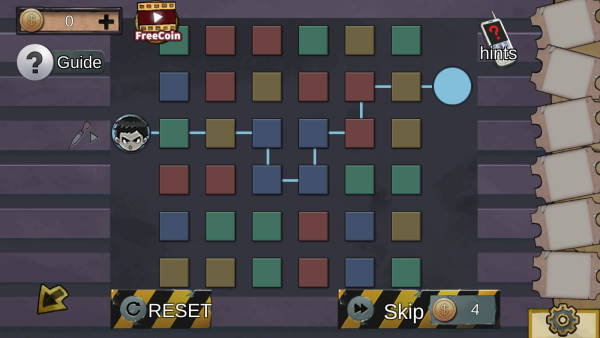
There’s really no hard puzzle to complete here, just treat this like a game of Candy Crush. You need to clear a path as indicated by the blue line to bring the little guy all the way to the blue circle on the right side.
Inside the Storehouse
Examine the red car. Examine the purple dress shirt and pick up the car keys beneath it. Pick up the saw blade underneath the steering wheel. Use the car keys on the car trunk to unlock it, then grab the shovel.
Examine the tools on the wall and grab the wrench on the left side. Grab the broken electric saw from underneath the table and combine it with the saw blade.
Storehouse Entrance
Use the electric saw on the cage to cut it open and grab the half of a key from inside the striped box. Grab the leftover steel bars from the ground. Return to the security fence.
Security Fence
Examine the dirt mound on the other side of the fence. Use the shovel to uncover a spring knob and a note. Examine the bottom half of the scarecrow and use the wrench on the gear to turn it, revealing a power adapter.
Carriage
Examine the locked briefcase and use the spring knob on the circular indent to activate the briefcase. You’ll see drawing of kids scroll by – tap on the number that matches the number of kids. For us, it was 3 – 6 – 5, but it may be different for you. Grab the usb stick from inside the case.
Inside the Storehouse
Plug the laptop in using the power adapter, then insert the usb stick. It will show four number combos: 0405, 1945, 2315, and 1230. These are actually times, so convert them to 12-hour times: 4:05, 7:45, 11:15, and 12:30.
Examine the drawer below to find four clock faces. You’ll need to set them to the times listed above, from left to right. Grab the flashlight from the drawer.

Carriage
Examine the side of the carriage again and use the flashlight. You’ll see a hidden message on the wall of the carriage: IC (heart) BG.
Inside the Storehouse
Examine the glove compartment. It has the heart symbol alright, but there are only numbers that can be inputted. ICBG is actually a cypher, with the numbers corresponding to the position of the letter in the alphabet. For example, B would be 2 since it’s the second letter in the alphabet. The final code is 9327. You’ll get an insulation cloth – combine it with the steel pipe to get a grounded pole.
Security Fence
Examine the small puddle and use the steel pole to fish out the wire so you can grab the key safely. Combine the two halves together to get a full key.
Storehouse Entrance
Use the key on the padlocked door on the right.
Part 2
Storage Room
You’ll switch over to Bowen, waking up from his drug-induced sleep. Examine the bottom left box to and move the clothes to get scissors. Grab the planks against the top right corner. Examine the sink to get a red-hot iron. Examine the furnace and place the planks inside. Try to leave the room, then use the iron to break open the glass.
Hallway
Grab the y-shaped iron off the floor. Examine the crate in the background and open it to reveal some clothes and a paper that you can grab. Examine the turned over sofa and use the y-shaped iron to uncover the back and obtain a magnesium alloy stick. Grab the magcard next to the sofa, hidden a little bit in the darkness.
Storage Room
Use the magnesium alloy stick in the furnace to light the planks. Place the red-hot iron into it to heat it up, then use it against the X shaped mark on the wall. You’ll see a pattern appear, and you need to connect all the numbers in sequential order.

The middle X panel will open it up to reveal a key.
Hallway
Use the key on the door.
Balcony
Open the door and grab the conveyor belt and small stones off the debris. Examine the small crate in the background to get a 4-digit key lock with colors. These colors match all of the fruits you’ve been seeing, so punch in 3754 to get gasoline.
Examine the red panel on the wall in the corner. You’ll need to line up the mouth tokens in a specific order, so press:
- left x2
- middle left x3
- middle right x3
- middle
- middle left
- right x4
Grab the iron bar. Examine the music box on the ground and you’ll see notes hit different letters in a order, spelling out CANALIS.
Examine the motor and use the gasoline and conveyor belt on it. The large crate will lift up to reveal a hatch on the ground.
Storage Room
Examine the case under the sink and type in CANALIS. You’ll get elastic rope, then combine it with the scissors to snip it. Combine the sniped rope with the stone and y-shaped iron to get a slingshot.
Balcony
Use the slingshot on bottle hanging above to shatter it and reveal a key. Use it on the hatch.
Sewer
Grab the screwdriver. Examine the electronic lock on the wall and use the magsafe card, but something’s missing from the switch.
Hallway
Examine the frame on the wall and use the screwdriver on it to reveal a cupboard with an electric brake.
Sewer
Use the electric brake on the switch to activate power and head further into the sewer. Before you go forward, examine the pillar to find strange symbols on them. Tap on the segments to switch the patterns and match them up with what you have on your paper.
Deep Sewer
A massive waterfall blocks your way. Grab the red scarf off the ground. Use the scarf on the valve, then use the iron bar to turn it to stop the waterfall. Examine the uncovered stone pillar on the left side. Match it up with what you have on your paper.

A secret passage will open up on the left side of the sewer.
Secret Sewer Tunnel
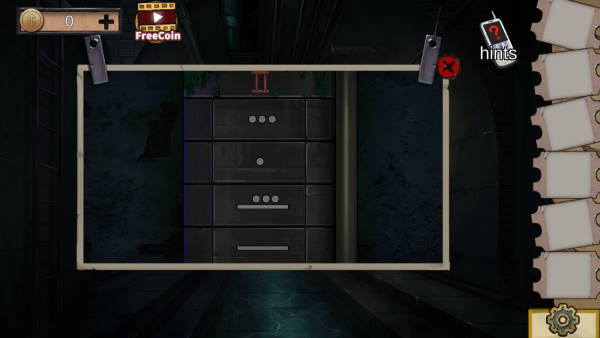
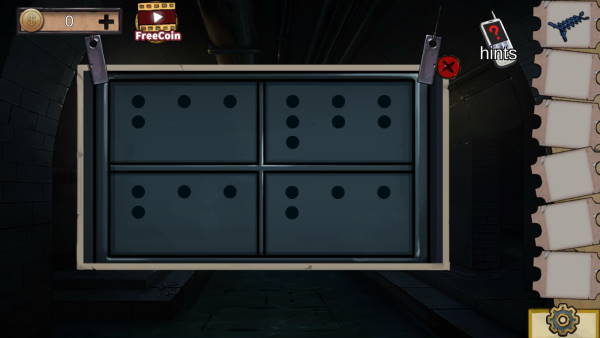
Examine the red backpack to read a note and get a super excavator. The circular object in the background contains four quadrants. Tapping on a quadrant will increase the amount of dots in it – you need to add up the dots like so (make sure to add one more dot to the bottom right quadrant).
You’ll get an intercom without the antenna.
Deep Sewer
Use the super excavator on the object behind the sewer palisade to get the antenna. Combine the two intercom pieces together. Congratulations, you are officially done with the second chapter of Park Escape!


Published: Jan 7, 2021 08:19 pm