Trying to survive in the world of Minecraft Pocket Edition can be a feat, but there are lots of tools to help you succeed, with one such tool being the brewing stand. The brewing stand allows players to concoct potions that can grant themselves temporary buffs and debuff enemies.
The brewing stand requires some steps to properly use, and it might be a little complex if you’re new to Minecraft, so we’re here with a guide on how to use a brewing stand in Minecraft Pocket Edition.
How to Acquire a Brewing Stand
You’ll need to get your hands on a brewing stand before you can start your alchemy career. There are two ways to get obtain one: find a village that has a cleric in it and take their brewing stand, or craft one yourself. To craft a brewing stand you need:
- 1 blaze rod from the Nether
- 3 cobblestone

Cobblestone is easy to get, but the blaze rod is the hardest material to find. You’ll need a way to get to the nether, which means you need to find enough diamonds to make a diamond pickaxe to mine obsidian.
Build a nether portal using the obsidian and then scout around for a nether fortress. It can be hard locating a nether fortress, so make sure you carry some extra blocks to leave as markers of where you’ve searched. Cobblestone works well, as it cannot be blown up by ghast fireballs.
Deep inside nether fortresses are blaze spawners which spawns the blaze mobs. These guys shoot fireballs at you that can be blocked, so make sure to bring a shield. Hang out around a blaze spawner and make sure it’s not too lit, as they will stop spawning.
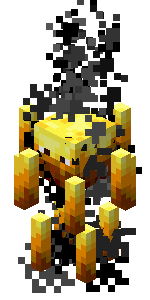
Blazes have a very small chance to drop blaze rods, so it helps if your weapon has the Looting enchantment on it. Keep fighting them until you get a blaze rod, but stick around and try to get a few more – you’ll need them for fuel.
Gathering Ingredients
You’re going to need lots of nether wart, a red fungus that grows naturally in the nether. Keep an eye out for it as you’re exploring the nether fortress, as you may come across a garden of them. Bring them back to the overworld with some soul sand (nether wart only grows on soul sand) and you can create your own nether wart farm at your base.

You’ll also need bottles, which can be crafted using glass. Smelt sand to create glass. Smelt a lot of glass, because you’ll be using many bottles. Drinking a potion will leave the empty bottle behind though, so at least you get to reuse them.
To walk you through the process, we’ll start with a simple potion of swiftness. You’ll need sugar for it, so find some sugar cane.
Fill empty bottles up with water, either by using a water block or a filled cauldron. Water bottles are the base to any good potion!
Related: Minecraft Pocket Edition: Best Commands
Brewing your First Potion
To start things off, craft some blaze powder from the blaze rods you collected from the nether. You just have to put blaze rods in your crafting grid to create powder – no fancy tools needed.
Use your brewing stand and the brewing interface should show up. At the top left you’ll see a blaze powder silhouette, so go ahead and put your blaze powder in to fuel the brewing stand. You’ll notice an orange bar fill up inside the connected oval – this is to show you how much fuel is left in your brewing stand before you need to fill it again.
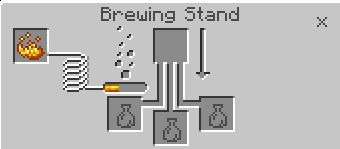
Now, place three water bottles into the bottom three slots. Your main ingredient will go in the top slot, so put a nether wart in and the brewing stand should start mixing the bottles. After a few seconds your three water bottles will turn into awkward potions, the base for most potions in the game.
With the three awkward potions still in their slots, place a sugar into the top ingredient slot. If you’ve done everything right so far, your awkward potions should turn into glowing potions of swiftness!
Congratulations, you’ve brewed your first potion! The fun doesn’t stop there, though. There are ways to improve your potions and there are plenty of more potions to discover as well.
Improving & Changing Potions
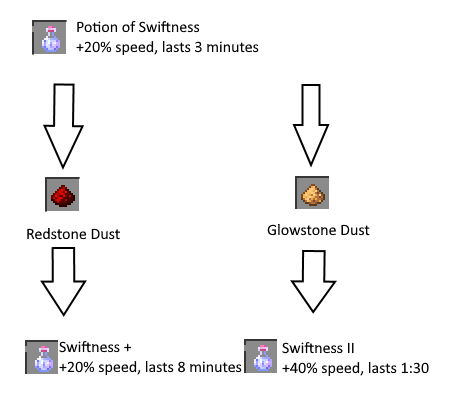
You can improve a potion’s potency or duration by adding in either glowstone dust or redstone dust, respectively. Try adding either dust while your completed potions are still sitting in the brewing stand, and they will be mixed once more.
The resulting potion will be an improved version of the same potion. You can do this for just about every potion in the game, though there are some exceptions. Bear in mind that you cannot have both improved potency and duration in one potion – you must choose one or the other.
You can add gunpowder to completed potions to turn them into splash potions, which are potions that can be thrown. Splash potions, as the name implies, can splash and affect multiple entities, which useful for when you want to buff yourself and your friends or debuff a group of enemies.
You can further improve splash potions by adding in the hard-to-get dragon’s breath from the ender dragon to turn them into lingering potions. These potions splash just like before, but they also leave a lingering cloud that will constantly provide the potion’s effect for a short time.
We’ve only covered beneficial effects so far, but you can also use potions against enemies for some chemical warfare. Simply mix in a fermented spider’s eye (spider eye + sugar + mushroom) into a complete potion to create an opposite, negative version of that potion.
For example, mixing a fermented spider’s eye into a potion of swiftness will result in a potion of slowness, which can be used to slow enemies down. Mix in some gunpowder to turn it into a splash potion and you’ve got yourself a grenade that can hinder your foes.
Related: Minecraft Pocket Edition: How to Play Multiplayer
List of Potions
Now that you know how to using the brewing stand, here is a complete list of the potions you can make with it.
Helpful Potions
- awkward potion +
- sugar = potion of swiftness
- rabbit’s foot = potion of leaping
- blaze powder = potion of strength
- glistering melon = potion of healing
- ghast tear = potion of regeneration
- magma cream = potion of fire resistance
- pufferfish = potion of water breathing
- golden carrot = potion of night vision
- + fermented spider eye = potion of invisibility
- turtle shell = potion of the turtle master
- phantom membrane = potion of slow falling
Harmful Potions
- fermented spider eye +
- potion of swiftness / leaping = potion of slowness
- potion of healing = potion of harming
- potion of strength = potion of weakness
- awkward potion + spider eye = potion of poison
- + fermented spider eye = potion of harming
- water bottle + fermented spider eye = potion of weakness
And that’s it! You now have all the knowledge you need to become a master brew. Go on – try making some potions of your own!


Published: Nov 6, 2020 06:16 pm