When a case involving disappearing children ends up bringing two unsuspecting agents to an abandoned amusement park, things take a turn for the worse. Park Escape is a point and click puzzle adventure game featuring tense atmosphere, a crazy amount of logic puzzles, and a dark mystery to solve.
In today’s Park Escape guide, we’ll walk you through the entirety of chapter 1 and give you all the puzzles solutions as well.
Chapter 1: Abandoned
Part 1
Park Gate
Tap on the manhole cover near the bottom right corner of the screen then take the stick. Tap on the guard booth on the left side of the screen to get closer. You’ll see a screw driver sitting on the desk, but the booth’s window is in the way. Use the stick on the window to break it.
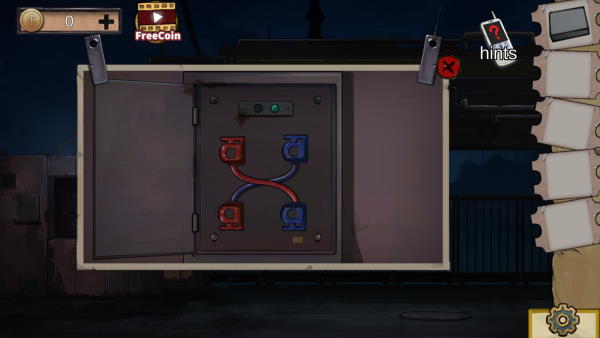
Move into the guard booth, then take the screw driver. The desk has two drawers – open the one on the right to obtain a wax block. Exit the guard booth and examine the fusebox on the left side of the booth. Use your screw driver to open it up, then move the red cable to the bottom red connector to restore power.
Go back into the guard booth and flip the breaker switch on the wall. The park’s gates are now open, so go ahead and enter.
Park Entrance
You’re not out of the woods yet – looks like the entrance to the actual park has been barricaded with a bunch of containers and luggage. First, examine the bronze colored can near the bottom right corner twice to pick up an empty can.
Take a look at the barricade. On the left side, there’s a long rectangular green container. Examine it and tap on it to lift it and grab the string it was on top of.
To the right of that container is a dark green duffel bag. Try to open it, but the zipper will get stuck halfway. Lubricate the zipper with the wax block and it will open. Grab the plier half and iron box.
Examine the lockbox on the ticket counter. It’s locked with a mechanism – you have to line up all three switches to unlock it. From the default starting positions, hit the top switch three times, then hit the bottom switch four times. Take the small key inside and head back to the Park Gate.
Park Gate 2
Head back inside the guard booth. Examine the desk again, and this time look at the left drawer. Use the small key to unlock the drawer and obtain half of a plier. Combine the halves of the plier to assemble it.
Before you go, take a look at the two pieces of paper on the wall to find a picture with some toy blocks. There are six blocks in total, and each one has a number on it. Each number is colored differently, and you’ll notice that you can line up these colors with the iron box you got from the duffel bag.
Examine the iron box in your inventory and enter the code “2907” to unlock it and obtain a hammer. Once you’re done, head back into the Park Entrance
Park Entrance 2
With the completed pliers, you can now open the barred window behind the ticket counter. Go through and you’ll find yourself in…
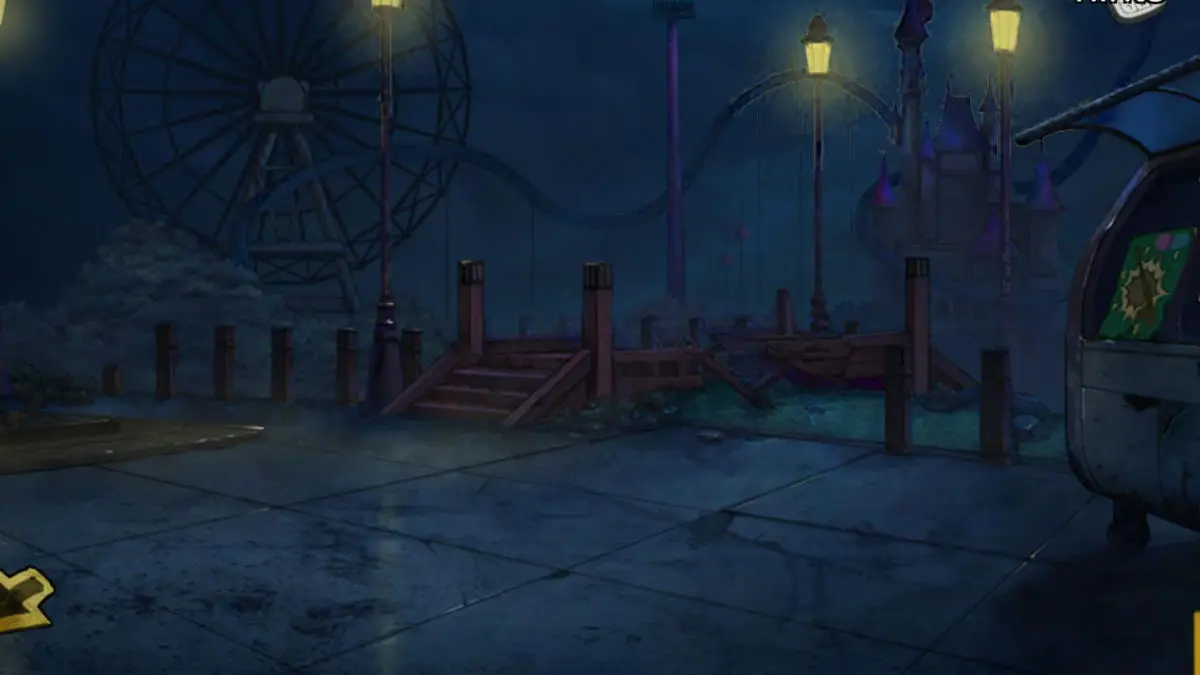
Park Plaza
You’re finally in the park. First off, examine the ground near the lamppost at the left side of the screen to find an iron bar and some dirt. Combine the dirt with the empty can to get a can with dirt and exit back into the plaza.
Look at the lamppost closely and you’ll notice something inside the lamp. Use the can with dirt on the lamp to break it and obtain a knife.
Go to the balloon popping game on the right side of the screen. There’s a key on the balloons, but they’re blocked by a grate, so take the tongs on the counter for now. Exit out back to the plaza, but this time tap on the bottom portion of the balloon game to examine a sketchy looking metal plate. You’ll see a crack in the plate, so use the iron bar to pry it open and obtain a box of nails.
The bridge to the rest of the park has collapsed, so we’ll need to find another way around. Take a close look in the river and you’ll spot something on the bottom, but it’s out of your reach. Return to the Park Entrance.
Park Entrance 3
Examine the long rectangular box on the barricade once more. Use the knife to cut it open, revealing a laser gun. Go out to the Park Gate.
Park Gate 3
Head back into the guard booth and examine the superglued can. Use the knife to peel the edges and open the lid, then use the tongs to grab the piece of paper sitting in the liquid.
Examine the wall lamp, then use the wet paper on it to try it. You’ll see an interesting diagram with a bunch of stars on it. Be sure to take the paper back and exit out of the booth when you’re done.
Examine the manhole cover and use the iron bar to pry it open. This will break the iron bar, but you don’t need it anymore anyways. Head inside the sewers.
Sewers
Examine the battery package on the floor and tap on it to open it and obtain batteries. Combine the battery with the laser gun to charge it. You’ll notice something hidden behind the bars, but the gate is locked.
Examine the box on the right side of the sewers and you’ll see a mechanism with a bunch of stars on it. Notice that the mouth in the middle of the mechanism looks like the moon on the wet paper? Just keep in mind that the paper is rotated, so to make things easier we’ve rotated the paper for you as reference.

You’ll get a hook for your troubles, so go ahead and combine that with the string to get a hook with string. Head back to the Park Plaza.
Park Plaza 2
Examine the river once more to spot the notebook on the bottom. Use the hook with string to fish it out a child’s diary to learn some more clues.
Go up to the balloon popping game and use the laser gun to start the balloon minigame. Wait until the red line is hovering over the balloon with the key on it, then tap to stop it. Do this one more time to pop the balloon, causing it to drop to the balloon below it.
Keep doing this until the key reaches the bottom. Each shot takes a segments of the battery power, and if you use all five segments you’ll need to restart the minigame. Time your taps carefully. Return to the sewers.
Sewers 2
Use the key you got on the gate to unlock it. Uncover the black tarp to reveal some wooden planks, then combine it with both the hammer and box of nails to get a nailed board. Return to the Park Plaza.
Park Plaza 3
Use the nailed board on the middle of the collapsed bridge to lay it down. You can now cross over to the rest of the park safely. This concludes part 1 of chapter 1!
Part 2
Main Park
You’re now in the heart of the park. Examine the broken window on the ice cream truck to get a closer look. Take the brown towel, then exit out and tap on the police tape to cut through and move on.
Carousel
Take the iron bar from the left side of the screen. Examine the left-most horse and grab the key from its mouth. Examine the horse in the background to get a unicorn horn. Return to the Main Park.
Main Park 2
Use the key on the gate to the left to unlock it, and go through.
Ferris Wheel
Head upstairs and grab the wrench and petrol can from off the floor. Return to the Carousel.
Carousel 2
Use the petrol on the dark stain in the center of the carousel, then wipe it clean with the towel. You’ll reveal a code: “49172”. Return to the Ferris Wheel.
Ferris Wheel 2
Tap on the door and enter the code to unlock it.
Power Room
Grab the hook off the console. Move the chair on the left side of the screen aside and grab the handle underneath. Open the cabinet right next to the handle and grab the jack inside.
Examine the breaker and use the handle to open it. Your objective here is to flip all the switches into the up position to restore power. Tap on a switch to flip it, but this will cause all adjacent switches to also flip. From the starting default positions, flip the switches in this order:
- middle
- top left
- bottom middle
- top left
- bottom left
- bottom right
- top right
- middle
Return to the Ferris Wheel.
Ferris Wheel 3
Power has been restored, but the Ferris Wheel is still stuck. You need to manually apply power to move it, so examine the console up the stairs. You’ll see three knobs: turn the left one once, turn the middle one three times, and turn the right one three times.
Use the iron bar to pry open the carriage’s door. You’ll find a metal case with a unicorn on it – place the unicorn horn in the indent on its head to get a wheel. Return to Main Park.
Main Park 3
Examine the broken window and use the hook to grab the basket full of screws. Examine the bottom of the truck and use the jack to prop the truck up. Place the wheel on, put the screws in, then tighten them with the wrench. Tap on the truck rapidly to push it.
With the truck out of the way, you’ll see two windows on the kiosk. Examine the left window to find a box with a tile puzzle on it. From the default starting position, tap the arrows in this order:
- top row left
- right column up x2
- top row left
- middle row right
- right column down
- middle row left
- right column up
- middle row left
- right column up
- middle row left
- right column up
- middle row right
- right column down
- middle row left
- right column down x2
- bottom row left
- right column down
- bottom row left
- right column down
Grab the screwdriver and go to the Carousel.
Carousel 3
Examine the middle horse and use the screwdriver on its wings. Return to the Main Park.
Main Park 4
With the way open, you can now proceed to the rest of the park. Go through the new way by the kiosk.
Circus Entrance
Attempt to chase after the figure, but they’ll block the circus entryway. There’s a hole on the side, but it’s blocked by barbed wire. Examine the rubble near the bottom right corner of the screen and dig through the rocks to get a handle. Grab the photograph by the flickering lamppost. Examine the cracked lamp to get some broken glass. Exit through the left gate.
Roller Coaster Control Room
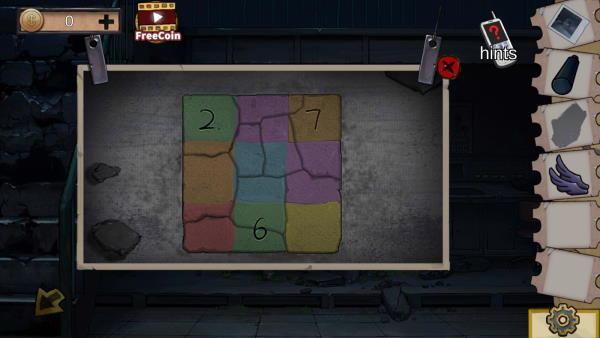
Examine the debris on the ground to get a crushed slate and shovel. Examine the console to find a clown badge hidden behind glass. Enter the code in this order: triangle, circle, square, and the asterisk symbol (not the star).
Examine the pieces on the table. You’ll need to put the colored pieces in the right places, so start with the edge pieces to make it easy. If a piece snaps into place, it’s in the right spot. You’ll notice one piece is missing when you’re done – it’s the piece you picked up off the ground, so fit it in to reveal three numbers: 2, 6, and 7. Return to the Circus Entrance.
Circus Entrance 2
Examine the dirt patch near the center lamppost and use the shovel to dig out a lockpick. Use the lockpick on the locked gate to the right. From the default starting position, hit the pin tumblers in this order:
- middle left
- middle right
- rightmost
- leftmost
Bumper Cars
Examine the red bumper car to get a key from the doll’s hand using the glass shard. Examine the green bumper car in the background to get a doll head. Open the door to the storage room in the background and a bunch of junk will fall out.
You’ll see a box with a colored tile puzzle on it, not unlike the puzzle you solved earlier in the Roller Coaster Control Room. Three tiles are already filled in for you, and you can fill in three more using the solved puzzle: 2 in the top left, 6 in the bottom middle, and 7 in the top right.
What you need to do is that each row and column must add up to the numbers displayed on the outside of the board. For instance, the top row is 2 + 6 + 7 which is 15. Fill in the tiles like this:
2 6 7
3 9 4
8 6 3
You’ll obtain a luminous circular object. Before you leave, take note of the numbers on the bumper cars. Return to the Roller Coaster Control Room.
Roller Coaster Control Room 2
Unlock the padlock on the cabinet to reveal an iron box with four colored buttons. You must input the code as indicated by the bumper cars, so put in “2049”. Open the box and take the matches. Return to the Power Room.
Power Room 2
Examine the center console. Place the clown badge in the circular slot and turn on the power. Bright lights can be seen, so exit the Power Room and suddenly it will burst into flames.
Go upstairs and you’ll see the Ferris wheel carriages lit up in a peculiar fashion. Return to the Main Park.
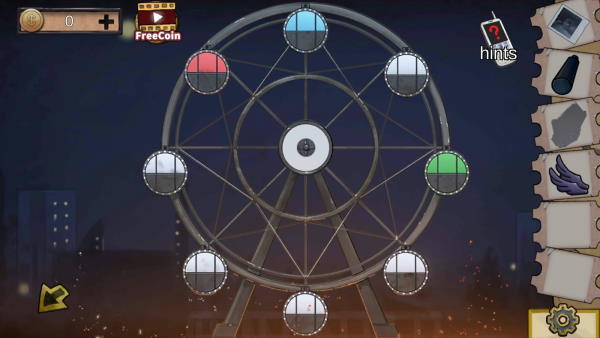
Main Park 5
Place the luminous circular object in the door to the haunted house. Tap on the lights to change the color, and make them match what you saw on the Ferris wheel. Enter the haunted house.
Haunted House
Place the doll’s head in the devil baby’s arms. Place the angel wings on the left angel, who is missing wings. The stomach will open up to reveal a candle, so light it with the matches. The other angel’s stomach will open as well, so light the candle there too.
There are now two symbols glowing on the wall in the center of the room. Drag both of them to the middle. The symbols will slide into place when you have them in the right spot. They will form a pattern that sort of looks like a clock. Exit and return to the Carousel.

Carousel 4
Grab the pliers off the ground, then return to the Circus Entrance.
Circus Entrance 3
Examine the hole in the Circus tent and use the pliers to cut the barbed wire.
Circus Tent
Examine the blue and white board and take the knife. Examine the wheel near the bottom right corner and use the handle on it to turn it, causing the right ladder to drop down. Climb up and grab the iron plate shaped like a child.
Climb up the left side ladder to find a rope and a lockbox. Cut the rope using the knife, then climb back down and pick up the hammer. Return to the haunted house.
Haunted House 2
Use the hammer on head of the laughing demon statue to get an electronic clock. Look at the time symbol on the wall – it reads 7:15 am, so set the clock to that time. The clock will read out a code: “45076”. Go to the Roller Coaster Control Room.
Roller Coaster Control Room 3
Examine the box underneath the table. Place the iron plate child onto the indent and hit the power button. The clown on the left will move their arms up, down, left, or right several times. Watch carefully and memorize the pattern as it will be randomized for everyone.

Repeat the pattern yourself correctly and one of the blips at the top will turn green. The clown will do another pattern, so mimic them once more. Collect the kerosene from the box. Return to the Circus Tent.
Circus Tent 2
Climb the left ladder and punch in 45076 into the box to get a lamp. Combine the lamp with the matches and kerosene to light it. Climb down and examine the center door.
The objective of this puzzle is to move the colored dots to their matching colored tiles. You do this by tapping on the buttons with the arrows on them: the arrows facing right will spin all surrounding dots clockwise, while the arrows facing left spin counter clockwise.
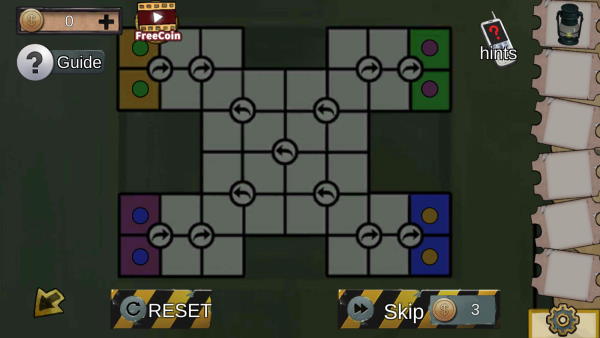
Start with the green dots and move them towards the purple dots. Move the purple dots southwest to their home, and then move the blue dots east. Finally, move the yellow dots northwest.
Congratulations! Finishing this puzzle marks the end of chapter 1 of Park Escape.


Published: Dec 29, 2020 02:21 am