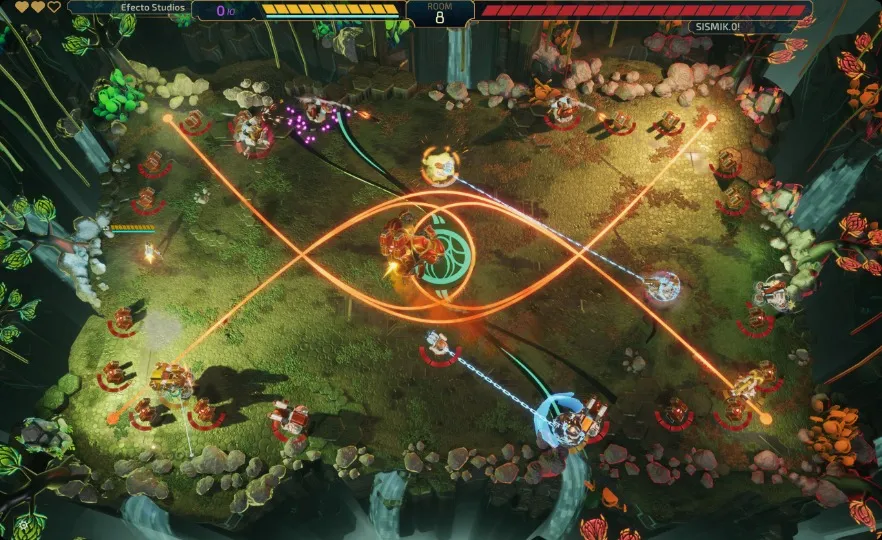
Welcome to Decoherence, a real-time tactical shooter that puts you in the shoes of a mech pilot. Deploy powerful bots around the battlefield and use tactics, power-ups and super mechs to dominate your opponent!
In our Decoherence tips and tricks guide, we will go over all of the building blocks of a good squad. We will list some example combos for pilots, bots, and power-ups, and talk about the strengths and weaknesses of each. Let’s get started with our Decoherence cheats, tips and tricks strategy guide to building squads!
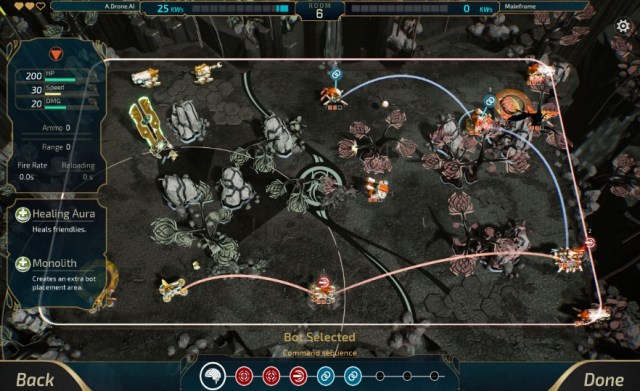
Bot commands are very important!
As you learned in the tutorial, you can order individual bots around to perform a set of tasks in order they are given. If you do not assign a bot any commands, they will simply move towards the enemy base and attack anything in side.
With commands, you can play out specific strategies that may work better. Do you have your frontline rush in, then delay the backline so that they sneak into the base while the enemy bots are distracted? This is just one example of how you can use commands to your benefit.
It is perfectly fine to just the let the bots decide on their own, but good strategies are key to taking down some of the harder opponents.
Do not approach bots directly on foot!
Every pilot has access to their own sub weapons and main weapons, but this does not mean that you should approach enemy structures or bots head on! Your pilot is very fragile and they will go down in several hits from enemy attacks.
With some careful maneuvering and the right gear, you can actually take down enemy bots and even pilots. But just remember that if you go down, that’s it – you will automatically lose. Only be risky if it is really necessary and you have an escape plan.
Place your bots carefully!
When you put your bots down, bear in mind that they cannot be respositioned once place. If you want to move them, you will have to recycle the current bot on the field, and this will only refund about a fraction of the bot’s original KW cost. This is very wasteful and inefficient if you recycle too much.
When you are putting down bots, make sure not to accidentally put them in the wrong place to ensure that you are getting the most out of your KW.
Play some games using the Beginner Squad!
Before you jump into online play or the Entropy mode, we highly recommend you play a few VS A.I skirmish matches to get a feel for how the game flows. The tutorial teaches you the basics, but you will need some actual field experience to understand the individual mechanics. You can also test out your squad is a stress-free environment in the Test Field.
Once you get a few matches under your belt, you are almost ready to hop into competitive play. The first thing you will need to do is to adapt and create your own squad!
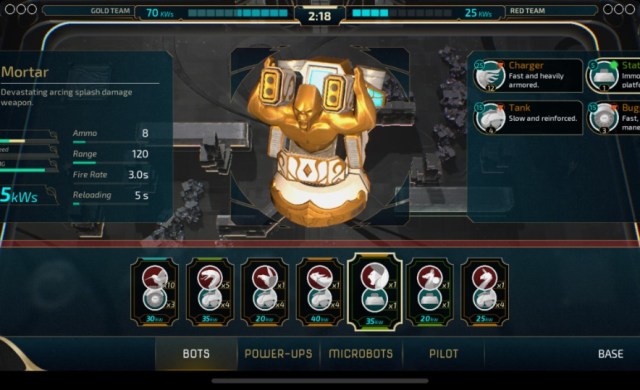
Squad Building: Bots!
Your squad is comprised of five components: your bots, power-ups, microbots, pilot, and mech. There is a lot to cover here, so buckle up and get ready!
The first and most integral part of your squad are your bots. Your bot selection is determined by what action and base components you pick. Action components grant abilities, while base components change how your bots move.
Squads can have up to 8 unique action components and 4 base components. You can stack more of the components to have more bot options in a battle, and each stack costs 1 point. You can have a maximum of 20 points of action components and 20 points of base components.
When deciding on components to use, try to build a strategy. Do you want to have a full offensive team with mortars, blasters, and gatlings? Or do you want to mix in some defensive and utility components like the laser, barrier, and healer?
The base components are just as important. There is an endless amount of combinations, like a heavy gatling tank that leads the way? Or how about a healer buggy that can get around the battlefield quickly, healing your bots along the way? It is all about potential combos and how well they synergize. Try to make combos that work well together!
Squad Building: Power-ups
Power-ups are upgrades that stick on a bot until they are destroyed. The right power-ups on the right bots can make the strongest bots even stronger.
Power-ups are divided into three types: alpha, beta, and gamma.
Alpha Power-ups – Equip up to 2
- Liquid Nitrogen: Bot will freeze enemies in place with their attacks.
- SloMo Field: Incoming projectiles and enemies will be slowed down.
- Respawner: When this bot is destroyed, a clone is created in its spot. The clone is not as strong as the original, and this effect can only happen once.
Beta Power-ups – Equip up to 3
- Vampire: This bot’s attacks regenerate HP.
- Shield: The bot gains a defensive shield which must be depleted before HP goes down. If left undamaged for a set amount of time, the shield regenerates!
- Vengeance: Upon death, the bot will have a larger explosion than normal, dealing massive damage to nearby bots.
- Damage Booster: Increases damage.
Gamma Power-ups – Equip up to 3
- Reloader: Decreases reload time.
- Robot Range: Increases bot’s range by 1.5.
- Die Hard: Bot’s attack increase when HP is low.
- Last Breath Protocol: Upon death, this bot will remain on the field for a few more seconds before completely dying. The bot is invincible during this.
- Piercing Ammo: Bot’s attacks gain the ability to pierce through shields, barriers, and mechs.
- Stealth: Bot is invisible until it takes an action.
Remember that you can bring up to a total of 8 power-ups with you into battle.
SloMo Field is good for the melee type bots, as it will help them get closer to their pray. Shield is good on a heavy bots that can take a lot of punishment, and the shield will make them even tankier. Respawner is good for important stationary bots, like Healers or Mortars.
Knowing what to apply to which types of bots is ultimately up to you, but like almost everything else in the game, there are tons of effective combos!
Squad Building: Microbots
Microbots are cost-effective, cheap little mobile bots that can provide minuscule beneficial effects on the battlefield. If you have left over KW, you can spend it on some microbots. You can bring up to 2 types of microbots with you into battle.
- Kamikaze: These guys will seek out targets and self-destruct, causing some damage.
- Health Pack: Heals anyone (including enemies!) it comes into contact with. Be careful not to heal your enemies!
- Mosquito: A light machine gun unit. Cannot be touched if it keeps its distance.
- Barricade: These bots are mobile barriers, essentially.
Microbots can be helpful in a pinch, but do not prioritize your KW on them, unless you have a specific strategy built with them in mind.
Squad Building: Pilots
Your pilot can bring with them 2 primary weapons and 2 secondary weapons into battle. Each pilot also excels at different areas, so choose the one that fits your playstyle!
Pilots
- Tadashi: The all-around starter pilot. Has no obvious weaknesses or strengths, and gets balanced stats when on a bot. Fits in just about any squad build!
- Sabrina: Sabrina is fast and agile on her own, but she is very fragile and weak. When she is piloting a bot, she moves even faster and her bots deal a lot of bonus damage. Her bot attacks can also pierce on their own without the use of the power-up!
- Sam: Little penguin Sam is immune to immobilizing and speed reducing effects. He is even faster than Sabrina on foot and in bot, but he deals very little damage when piloting bots.
- a.Dron.AI: AI has the most HP out of all of the pilots, but its stat boost to piloting bots is the worst, with the exception of a huge attack boost. AI also heals the bot its piloting slowly.
If you like to pilot your bots, we recommend using either Sabrina or Sam for the bot buffs. If you like playing a little dangerously, AI’s huge attack boost but low HP and SPD boost can really destroy enemies if handled right. When in doubt, Tadashi is also always a good choice!
Primary Weapons
- Steel Piercer: Short range rapid fire weapon.
- Handgun: High accuracy, but slow fire rate.
- Electric Baton: A shocking melee weapon. You can charge it the more you swing it!
- Assault Rifle: High fire rate but wildly inaccurate.
Secondary Weapons
- Personal Shield: Your own shield that can block projectiles from any angle. Its durability decreases with use, and recharges over time.
- Frag Grenade: Toss this over barriers and shield to do big damage in an area.
- Agility Boots: Use a charge to dash forward quickly. Has a maximum of three charges which recharge slowly overtime.
For primaries, we recommend using the default Steel Piercer or the Handgun. The Assault Rifle seems way too inaccurate to be reliable, and the Electric Baton puts you in too much danger, even though it can be helpful in a pinch.
For secondaries, they are all really good. The Personal Shield enables more aggressive plays or it can save your butt, which goes for the Agility Boots as well. Grenades are great for taking out bots that are placed too close together.
Squad Building: Mechs
At long last, we have reached the final section of squad building: the all-mighty mechs! Mechs are called down upon the final rounds of a PvP match, and they are very powerful bots that can turn the tide of battle.
For your weapons, we have the Mecha Gatling and Grenade Launcher. The Gatling Gun deals good damage over time, just be careful not to fire it for too long as it will overheat. If you are looking for something with more area damage, the Grenade Launcher is the better choice.
You can equip either weapon on either arm, so you could rock two of the same weapon if you really wanted to, or be balanced and have both of them. The choice is yours!
For your chassis, you can pick the Bulky or Agile chassis. The Bulky one is slow but has high HP, and it can use a powerful stomp attack to smash nearby enemies. The Agile one has less HP but can get around faster thank to its dash jets.
And with that, there is our guide on squad building. We have listed only a few examples, and that is the beauty of Decoherence – your success stems from your creativity! If you have any other strategies or examples you would like to share, be sure to leave a comment!


Published: Oct 21, 2019 09:37 am