CyberCode Online is a new text-based online RPG with a cyberpunk theme. Set in the distant future, players will start their journey in Shangri-La City, a bustling town full of people from around the world. From there, you’ll take various jobs and clean up the streets as you make a name for yourself. Ready to jump into the world of CyberCode Online? We’ll help you get started on the right foot with our CyberCode Online guide, tips and tricks for beginners!
CyberCode Online Beginner’s Guide
The world of CyberCode Online is vast and expansive, and because the game is mostly text-based, it might be a little hard to navigate the game at first. We’ll walk you through the basics of the game and how to start your adventure right.
Basic Combat: Surviving the Streets
Like any good cyberpunk-themed world, the streets of CyberCode Online are unsafe for the common traveler. You’ll have to fend off all sorts of enemies to survive, and you’ll get some nice and shiny loot for your troubles, making combat the core of CyberCode Online.
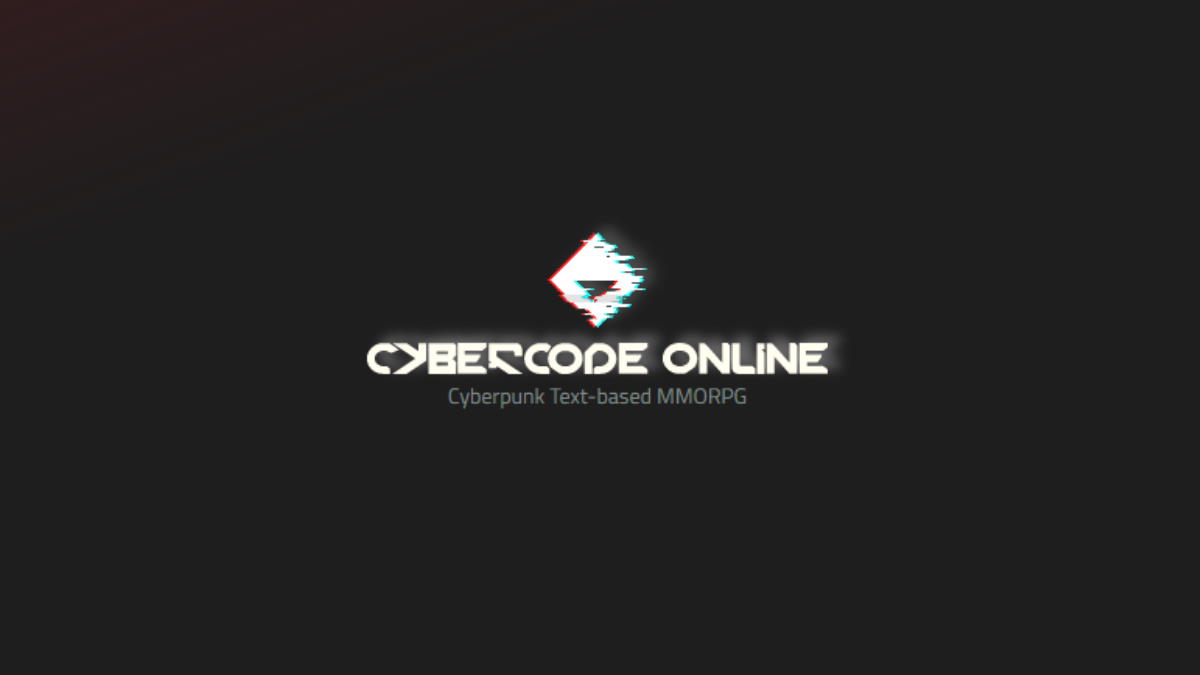
To get started, go to the Hyper Train Central Station under the travel section of Shangri-La City. There are three main stations: Flori, Hollto, and Torida Station, but you can only go to Flori Station for now, so head there.
You’ll see that each station is broken up into three different areas, and every area has its own recommended level range, so make sure you go to places that are appropriate for your level. Let’s start at the Grecian Synagogue, which is for players level 1 through 4.
Once you’re there, select the nearby enemies option to scout for random battles. You’ll be given a list of enemies, so take your pick. Keep in mind, you can only fight enemies that are equal or below your current level.
You’ll notice that some enemies have yellow names—these are modified enemies, and they’re tougher than the normal white-named enemies. Take them on if you’re up to the challenge, as they reward better loot, but be careful!
Once you’re in a fight, you’ll see three buttons at the bottom with your health. The buttons control your primary, special, and destructive weapons, from left to the right. You start out with only a primary weapon, so select it to attack with it.
But wait! You’ve probably noticed that multicolored gauge with the white marker running through it. This is the attack timing bar, and you can do bonus damage if you time your attacks right. Depending on where the white marker is when you select one of your weapons, you will do:
- Dark gray area: Normal damage
- Gray area: Slight damage boost
- Light gray area: Moderate damage boost
- Yellow area: Big damage boost
Basically, aim for the marker to be near or in the yellow area for the most damage. Once you defeat the enemy, you’ll immediately gain loot, experience points, and bitcoins (Or BTC), the main currency of the game.
Congratulations, you’ve defeated your first enemy. You’re going to be fighting a lot in CyberCode Online, so get used to it!
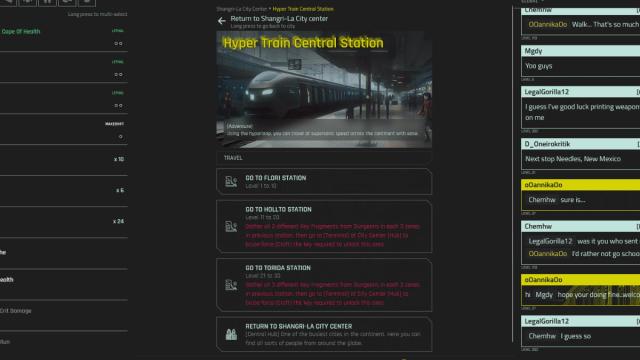
Gearing Up: Caches and Printing
Once you defeat a couple more enemies, you’ll probably get your hands on an item cache. These caches contain blueprints for gear, as indicated by their names. To create the gear inside the cache, you’ll need to use the Molecular 3D Printer at Shangri-La City.
Printing item caches cost BTC, with the cost increasing exponentially depending on the rarity of the cache. Once you print a cache, you’ll receive the corresponding item with a level that is directly equal to your printing rank, and the cache is consumed in the process.
The rarity levels are, from worst to best:
- Trash
- Common
- High Quality
- Rare
- Legendary
Caches are the main way of obtaining new and improved gear, so you’ll want to print as many of these caches as possible. However, it’s very important to keep in mind that the gear you get from the caches is ALWAYS equal to your printing rank.
For example, let’s say you have a Legendary Special Weapon Cache, and your printing rank is currently at level 5. If you print the cache now, you’ll get a legendary special weapon that is level 5.
Because of this rule, it might be better to hang onto caches in some instances, especially if they’re rare or legendary rarity. Not only do higher rarity caches cost a ton of BTC to print, but they’ll probably get outclassed quickly if you print them with a low printing rank. A legendary level 5 weapon is still a level 5 weapon, at the end of the day.
You can either stash caches for later once your printing rank is higher, or you can sell them, as caches sell for a lot of BTC. Since BTC is a problem early on, this becomes a viable strategy, so don’t be afraid to do it—you’ll most likely find more high-rarity caches later on in the game.
There are a couple of ways to increase your printing rank. Every time you print an item cache, you will gain experience, so it’s wise to print out low-rarity caches to help you level up. You can also take AFK jobs, which we’ll cover next!
Learning Skills and Farming Loot: Taking AFK Jobs
Don’t want to actively play the game but still want to earn stuff? This is where AFK actions come in. Whenever you head into an area at a station, in addition to looking for enemies to fight, you can also do AFK actions, which include the following:
- Deploy Farm Bot: Sends an AI-controlled drone into the dungeons to fight for you, which earns you experience points over time. (Costs 1 AI Core)
- Scavenge: Search the area for items, caches, and crafting materials, earning your scavenging experience in the process. Requires your scavenge skill to be at a certain level.
Both of these tasks will ask you how many times you want to do them. The more tasks you complete, the longer it’ll take, but you’ll end up with more rewards. Early on, you should be fine with doing only a couple of tasks, which shouldn’t take more than 30 minutes.
You can earn AI Cores from random enemy drops and scavenging, so don’t be afraid to use them if you don’t feel like manually grinding enemies for experience points.
In addition to these area activities, there are also AFK jobs you can take to improve your crafting skills. At Shangri-La City, under the travel section, head to the Shangri-La Commercial Area.
Much like the area activities, these AFK jobs require no input from you. Just wait the allotted time, and you’ll earn rewards based on the amount of time you put in. There are five types of jobs, each corresponding to the five different crafting skills. Here’s the complete list:
- Work in printing factory: Sometimes improves printing rank
- Hack a body mod clinic: Improves medical science
- Improve ammunition: Improves ammo crafting
- Reverse engineer scraps: Improves printing rank, more efficient than the printing factory (Costs 1 Tech Scrap, Tech Scraps can be acquired by scrapping old, unwanted gear)
- Initiate crypto mining: Improves mining skill and earn BTC (Costs 1 Hash Processor)
Get in the habit of taking on long jobs if you know you’re going to be away from the game for a while. It’ll help you keep up with your character progression even when you’re not actively playing the game. Just remember that your crafting skills can never go past your combat level, so you’ll have to fight enemies eventually.
Note that sometimes other players in the game will be gracious enough to use a global skip boost, which speeds up everyone’s AFK timers. If you ever see “skipping” followed by a number near the top of the screen, that means someone bought a skip boost.

If you see that someone activated a global skip, it might be worth it to drop whatever you’re doing and start up an AFK job, just to take advantage of it.
Unlocking New Stations: Obtaining Key Fragments
By now, you probably have a few battles and levels under your belt, alongside some spankin’ new gear. You’re probably ready to tackle your first dungeon! Dungeons are exploration areas filled with goodies, tough enemies, lore, and key fragments.
Dungeons are a little tough because unlike the random nearby enemies you can fight, your health is not automatically restored after every fight. You’ll need to use Pain Away to restore your health inside a dungeon.
Now’s a good time to talk about quick slots. At the bottom of the game menu, hit the inventory button. You’ll see all your equipped gear, and also three quick slots near the top. You can put consumables in your quick slots, and these will be conveniently made available during fights. Equip your Pain Away to one of your quick slots now.
Let’s start you off with the very first dungeon in the Grecian Synagogue. Instead of the nearby enemies button, hit the dungeons button instead, then pick the normal setting. The other two difficulties, challenge and gang, will unlock later. You can set the dungeon to public, and this will allow other players to join and help you, which is always nice.
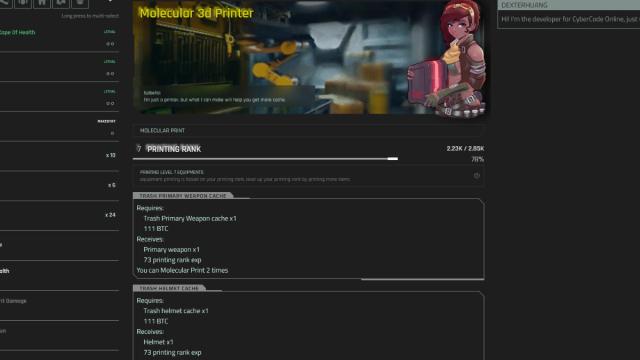
This will drop you into the dungeon, which is represented by a bunch of characters and symbols. You can click anywhere to move your character. Your goal is to eliminate every enemy in each room, then move onto the next until you find the special chest that contains the key fragment.
You’re probably overwhelmed by all the symbols, so here’s a quick breakdown of each symbol:
- @ – Player
- # – Wall or obstacle
- ! – Lore
- ? – Optional quest
- Box – Scavenge point
- Half-circle with legs – Enemy
- Box with ^ – Door to a new room
- Red cross – Health recovery station
Upon entering a new room for the first time, your first objective should be to wipe out all enemies, because you can’t search scavenge points or leave the room until all enemies are down. Remember that your health isn’t restored after dungeon battles, so make sure to top yourself off with Pain Away, or seek out a health recovery station.
Once you get towards the end of the dungeon, you should come across a special looking box that you haven’t seen elsewhere. These boxes contain the dungeon’s key fragment, which is what you’re mainly after.
All three zones in a station contain one key fragment, and once you obtain all three, you can unlock the path to the next station. So, for Flori Station, the first fragment is in the Grecian Synagogue dungeon, while the other two fragments are in the Graffiti-Covered Flori Pub and Glittering Flori Theatre dungeons.
Advanced Combat: Know Thy Enemy
At this point, you’re probably approaching level 10. Congratulations on your progress thus far, and we’re sure that you’ve started to have some close calls in your battles. The enemies from here on out are only going to get tougher, so here are a few more things you should know about combat.
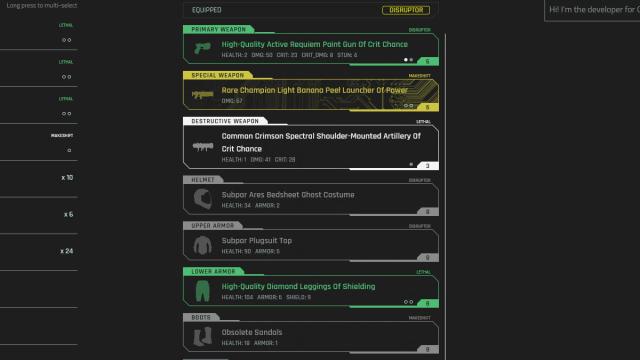
You probably got your hands on special and destructive weapons by now, so we’ll explain the differences.
- Your primary weapon deals the least amount of damage out of all three weapons, but it requires no ammo to fire.
- Special weapons deal moderate damage, with bonus damage applying to shielded enemies. Excess shield damage will spill over to the enemy’s health with no reduction. Special weapons require Energy Cells for ammo.
- Destructive weapons deal massive damage, but deal half damage to shielded enemies. Excess shield damage will spill over to the enemy’s health, but at reduced strength. Destructive weapons require Antimatter Charges for ammo.
Essentially, you’ll want to use special weapons on shielded enemies, and once their shields are broken, finish them off with your primary weapon. For tougher targets, use your destructive weapon to really bring on the pain.
Next, we’ll talk about equipment marks and gangs. We’re sure that you’ve noticed the random affixes that appear on your gear—these are equipment marks. There are three types of equipment marks: Lethal, Disruptor, and Makeshift.
Conversely, there are three gangs that make up the various enemies you fight in the game: Scavengers, Animals, and Voodoo Boys. The game uses a rock, paper, scissors system to deal out bonus damage.
We’ll explain how it works. Your equipment mark is determined by the majority of marks you have on your gear. For example, if most of your gear is Makeshift, then you will be considered to be a Makeshift player.
- Lethal players deal 10% more damage to Animals, while receiving 10% more damage from Scavengers.
- Disruptor players deal 10% more damage to Voodoo Boys, while receiving 10% more damage from Animals.
- Makeshift players deal 10% more damage to Scavengers, while receiving 10% more damage from Voodoo Boys.
You shouldn’t have to worry about this system for regular battles, but it might help you in dungeons. Most dungeons only have one kind of gang affiliated, so you can build around it to help you survive.
Closing Tips
That covers just about all the important basics you need to know to survive in Shangri-La City. Head out and fight random thugs on the street to gain experience points and BTC, print new gear using item caches, use AFK jobs to train up while you’re away, and explore dungeons to unlock new stations.
Don’t worry about dying too much early on, as there is no penalty. However, once you hit level 10, you’ll lose 10% of your BTC and experience points if you go down in a fight. In some instances, you can even level down, so you’ll need to be very careful. Don’t be afraid to run from fights, as it’s a guaranteed escape in regular battles, with a chance to fail in dungeon battles.
If you want to be extra careful, you can stash your BTC and items away at the Bank of Arasaka, which can be access from the Shangri-La City menu. If you’re heading into a dangerous dungeon, it’s a good idea to store your hard-earned BTC safely away.
That wraps up our CyberCode Online guide, tips and tricks for beginners. You should now be well on your way to becoming a legendary warrior, and if you have any other tips or questions about the game, let us know in the comments below!


Published: Oct 19, 2022 07:44 pm